A dataset defines which study data an extract contains: the subject, group and event attributes, the events and CRFs, and the individual CRF items. The Sponsor Data Manager or Study Administrator creates a dataset once and extracts it as many times as needed, for example before an interim analysis or a data review meeting. Each extract produces a file that stays available for download on the dataset.
Path: Study Name → All Tasks → Extract Data → Datasets
Who can use Datasets:
Available to 8 roles
Clinical Research CoordinatorInvestigatorStudy AdministratorStudy SponsorSystem AdministratorUnblinded RTSM AdminSponsor Supply ManagerSponsor Data Manager(default roles — your study may differ)The same roles create, edit, remove and restore datasets, run extracts, and download or delete the extracted files. A dataset that includes PHI unmasked can only be saved and extracted by a user who can also view PHI: Available to:Clinical Research CoordinatorInvestigatorStudy AdministratorSystem Administrator(default roles — your study may differ). See the Permission Matrix.
Datasets list
The Datasets list shows every dataset of the study.
| Column | Description |
|---|---|
| Name | The dataset name |
| Description | The dataset description |
| Site | The site the dataset is limited to, or All sites for a dataset that covers the whole study |
| Created On | Date and time the dataset was created |
| Created By | The user who created the dataset |
| Beginning date | Start of the temporal scope, if set |
| End date | End of the temporal scope, if set |
| Item Status | Completed, Non-completed or Completed and non-completed — which CRFs the dataset draws data from |
| Last Updated On | Date and time of the last change to the dataset |
| Status | Available, Removed or Auto Removed |
| Last Run | Date and time of the last extract |
Filters: Status, Site, Created On (date range) and Name.
Dataset statuses
| Status | Meaning |
|---|---|
| Available | The dataset can be viewed, edited and extracted |
| Removed | A user removed the dataset. It can be restored |
| Auto Removed | The dataset was removed automatically together with the study or site it belongs to |
Row actions
| Action | Available on | Effect |
|---|---|---|
| View | Available datasets | Opens the dataset detail |
| Edit | Available datasets | Opens the dataset in the three-step editor |
| Extract Data | Available datasets | Opens the extract page of the dataset |
| Remove | Available datasets (under the more-actions menu) | Opens the Remove Dataset dialog. Click Remove to confirm |
| Restore | Removed and Auto Removed datasets | Opens the Restore Dataset dialog. Click Restore to confirm |

What this should show: the Datasets list with three Available datasets (for example "Interim Safety Review – Bach Mai Hospital" limited to Bach Mai Hospital, and two datasets showing All sites), the Create Dataset button and the row actions View, Edit and Extract Data.
Create a dataset
Create Dataset opens a three-step editor. The steps are shown as tabs at the top of the page: 1 Dataset Properties & Scope, 2 Select items and 3 CRF Data. Use Back and Next, or click a tab, to move between steps. Submit is available on the CRF Data step once Dataset Name and Description are filled in.
- Open All Tasks → Extract Data → Datasets and click Create Dataset.
- On Dataset Properties & Scope, enter the dataset properties and, if needed, the temporal scope (see the tables below). Click Next.
- On Select items, select the subject attributes, group attributes, events and CRFs, and event attributes to include. Click Next.
- On CRF Data, select the CRF attributes and the CRF items to include in each selected CRF version.
- Click Submit.
After Submit, the dataset is saved and the extract page of the new dataset opens — see Extract a dataset.
Step 1: Dataset Properties & Scope
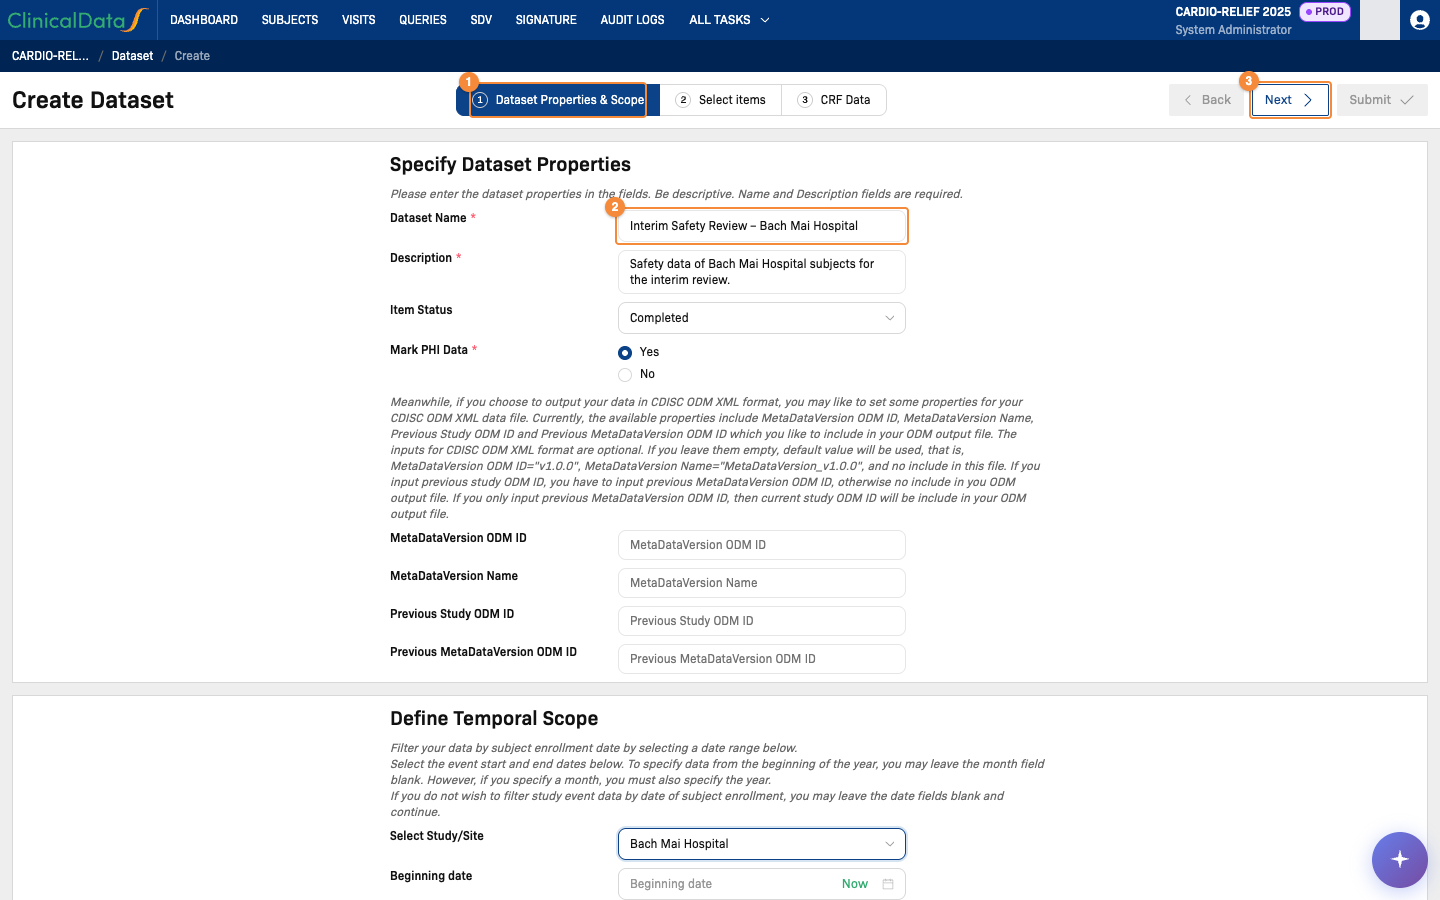
- Step tabs: Dataset Properties & Scope, Select items and CRF Data
- Dataset Name
- Next moves to the Select items step
Specify Dataset Properties
| Field | Required | Description |
|---|---|---|
| Dataset Name | Yes | Up to 255 characters. The name must be unique in the study or site |
| Description | Yes | Up to 2,000 characters |
| Item Status | No | Completed, Non-completed or Completed and non-completed: extract data from completed CRFs, non-completed CRFs, or both |
| Mark PHI Data | Yes | Yes masks protected health information in the extract. No extracts it unmasked, and is accepted only for users who can view PHI |
| MetaDataVersion ODM ID, MetaDataVersion Name, Previous Study ODM ID, Previous MetaDataVersion ODM ID | No | Properties written to CDISC ODM XML extracts. When left empty, MetaDataVersion ODM ID is v1.0.0 and MetaDataVersion Name is MetaDataVersion_v1.0.0. A Previous Study ODM ID is included only together with a Previous MetaDataVersion ODM ID |
Define Temporal Scope
The temporal scope filters the data by subject enrollment date. Leave both dates empty to include all subjects.
| Field | Description |
|---|---|
| Select Study/Site | The study (all sites) or one site, for example Cho Ray Hospital. The dataset is limited to the data of the selected site |
| Beginning date | Start of the subject enrollment date range |
| End date | End of the subject enrollment date range. Must not be earlier than the beginning date |
Step 2: Select items
Each block has a Select all checkbox.
| Block | Items |
|---|---|
| Subject Attributes → Subject Data | Subject Status, Person ID, and, when the study uses them, the secondary ID, date of birth and gender under the labels the study sets |
| Subject Attributes → Personal Data | The personal data fields the study collects, under the labels the study sets |
| Group Attributes | Subject Group Classes (each with its type, status and subject assignment) and Dynamic Group. Shown on studies that use subject group classes and dynamic groups |
| Choose data by Event | One block per event. Under Choose CRFs, select the CRFs of the event to include |
| Event Attributes | Event Location, Start Date, End Date, Event Status, Subject Age at Event |
Step 3: CRF Data
| Block | Items |
|---|---|
| CRF Attributes | CRF Version, Interviewer Name, Visit Date, CRF Status |
| One block per selected event | For each selected CRF and CRF version, a table of the CRF items. Select the items to include |
The item table shows Code, Label, Description, Section(s), Group(s), Data Type, Unit, Response type, Required? and PHI for each item. When no event or CRF has been selected in step 2, the step shows a message pointing back to Select items.
View a dataset
View in the list opens the dataset detail. The header shows Name, Description, Item Status, Created By, Created On, Last Updated On and Status, and the Edit button. Below the header, the page shows the selected items read-only: Subject Attributes, Group Attributes (on studies with subject group classes), Event Attributes, CRF Attributes and, per selected event, the selected CRF items.
What this should show: the detail of an Available dataset, with the header fields, the Edit button, and the Subject Attributes, Event Attributes and CRF Attributes blocks in read-only mode.
Edit a dataset
Edit in the list or on the dataset detail opens the same three-step editor under the title Edit Dataset, with the current properties and selections filled in. Change the steps as needed and click Submit on the CRF Data step. The changes are saved and the extract page of the dataset opens.
Only an Available dataset can be edited.
Extract a dataset
The extract page opens from Extract Data in the list or after Submit. The header shows the dataset properties: Name, Description, Item Status, Created By, Created On, Last Updated On and Status.
- Under Extract Formats, select the output format.
- For formats with a tabular layout, select Non-normalized output (one row per subject) or Normalized output (one file per CRF, one column per CRF item). Non-normalized output is selected by default.
- Click Extract Data.
A notification confirms that the extract is running: Your extract is running. You will receive an email and message when the extract is complete. Click OK to close it. The file appears under Extracted Files when the extract is complete. Exit returns to the Datasets list.
Extract formats
The standard formats are listed below. The platform configuration determines which formats are offered.
| Format | Normalized output available |
|---|---|
| CDISC ODM XML 1.3 Full with ClinicalDataS extensions (includes discrepancy notes and audit trails) | No |
| CDISC ODM XML 1.3 Clinical Data with ClinicalDataS extensions | No |
| CDISC ODM XML 1.3 Clinical Data | No |
| CDISC ODM XML 1.2 Clinical Data with ClinicalDataS extensions | No |
| CDISC ODM XML 1.2 Clinical Data | No |
| View as HTML | No |
| Excel older than 2007 (.xls format) | Yes |
| Tab-delimited Text | Yes |
| SPSS data and syntax | No |
| SAS transport file | No |
| Excel 2007 and newer (.xlsx format) | Yes |
| Comma Separated Values (.csv) | Yes |
Extracted files
Extracted Files lists every file extracted from the dataset.
| Column | Description |
|---|---|
| File Name | Name of the extracted file |
| Format | The extract format |
| Normalize | Whether the output is normalized |
| Run Time (Second) | Time the extract took to run |
| File Size | Size of the file |
| Created On | Date and time of the extract |
| Created By | The user who ran the extract |
| Action | Effect |
|---|---|
| Download | Downloads the file |
| Delete | Opens the Delete File dialog with the file name, created date and creator. Click Delete to confirm |
What this should show: the extract page of a dataset, with the dataset header, Comma Separated Values (.csv) selected under Extract Formats with Non-normalized output, the Exit and Extract Data buttons, and two rows under Extracted Files with the Download and Delete actions.
Remove and restore a dataset
Remove moves an Available dataset to Removed. A removed dataset cannot be viewed, edited or extracted until it is restored. Restore returns a Removed or Auto Removed dataset to Available.
- In the Datasets list, open the more-actions menu of the dataset and click Remove.
- Review the dataset properties in the Remove Dataset dialog and click Remove.
To restore, click Restore on the row of the removed dataset, review the properties in the Restore Dataset dialog and click Restore.
Related
- Casebook — read and export the data of one subject
- PHI Management
- Permission Matrix