PHI Management is the study-level page for reviewing every field that a study treats as Protected Health Information (PHI), assigning a masking method to each field, and running Smart Scan to search the study's actual data for PHI that has not yet been reviewed.
Path: Study Name → All Tasks → Data Compliance → PHI Management
System Settings → PHI Management is a separate, System Administrator–only console that tunes the numeric parameters behind the masking algorithms themselves (Age Group, Date Shift, Zip Prefix, Mask Last 4, Mask Phone) — it applies instance-wide, to every study. This page is the opposite: it is per-study and per-field, listing which fields in this study are PHI and which masking method each one uses.
This same page is also reached as a step of the Build Your Study wizard, under its own PHI Management step. Both entry points open the identical page; the wizard entry inherits the wizard's own access gate rather than adding a separate one.
How a Field Becomes PHI
A field can end up in this study's PHI list through one of three sources. There is no single screen for creating a new PHI flag — the list on this page only surfaces fields that are PHI already, through one of the following:
-
The built-in identifier catalog. Every study starts with the same fixed set of 19 identifiers, grouped as Names (Full Name, Last Name, First Name, Middle Name), Geographic (Address), Dates (Date of Birth), Contact (Phone Number, Email Address, Fax Number), and Identifiers (Ethnicity, Education Level, Medical Record Number, Identity Number, Citizen Identity Number, Social Security Number, Health Plan Beneficiary Number, Passport Number, Account Number, License Number). These are always present for Subject Information and Screening — no one adds or removes them.
-
CRF items. A CRF item can be flagged as PHI in its underlying item metadata. Today there is no toggle for this inside the CRF editor itself — an item is currently marked PHI only when the CRF is authored from a template/spreadsheet that already sets it. Once a CRF item is flagged, it appears in this page's field list with Go to location pointing at the CRF.
-
Dynamic fields — the custom fields a study can add to Subject Information, to an event, or to Screening. Each of these has its own PHI Data Yes/No toggle in its "Collect More Dynamic Data" section:
- Subject Information — Study Setup → Study Parameter Configuration → Collect More Dynamic Data.
- Events — each event's Advanced Settings step → Collect More Dynamic Data.
- Screening — Screening App Setting → its personal-data configuration section.
See Data Entry — Subject Information for where subject-level dynamic fields are entered.
PHI Field List
The main page is a read list with light edit — not a screen for creating PHI flags. It lists every field already in the PHI catalog for this study (built-in identifiers, plus any CRF item or dynamic field with PHI turned on), paginated.
| Column | Description |
|---|---|
| Field name | The field's label. |
| Field type | The underlying data type of the field (Name, Geographic, Date, Contact, Identifier, or the field's own data type for CRF/dynamic fields). |
| Importance | HIPAA sensitivity level shown as a chip: High, Medium, or Low (-- when not set). |
| Masking method | The masking method currently assigned to this field. If none has been explicitly set, the field's default method is shown instead, or -- when the field has no default. |
| Location | Where the field lives (for example Subject Profile, Screening, or the specific event/CRF). |
Row actions:
- Go to location — navigates to where the field actually lives: a CRF item opens in CRF preview; a Screening dynamic field opens Screening App Setting; every other field (built-in identifiers and Subject/Event dynamic fields) opens Study Parameter Configuration.
- Edit — opens a drawer to choose a masking method for that field. This action is only shown while the study is still configurable; once the study moves out of a configurable state, the action is hidden and the list becomes read-only.
The header also carries the Smart scan button and, once the study has been scanned at least once, a Last scan chip with the time of the most recent scan and its number of new findings — see Smart Scan below.
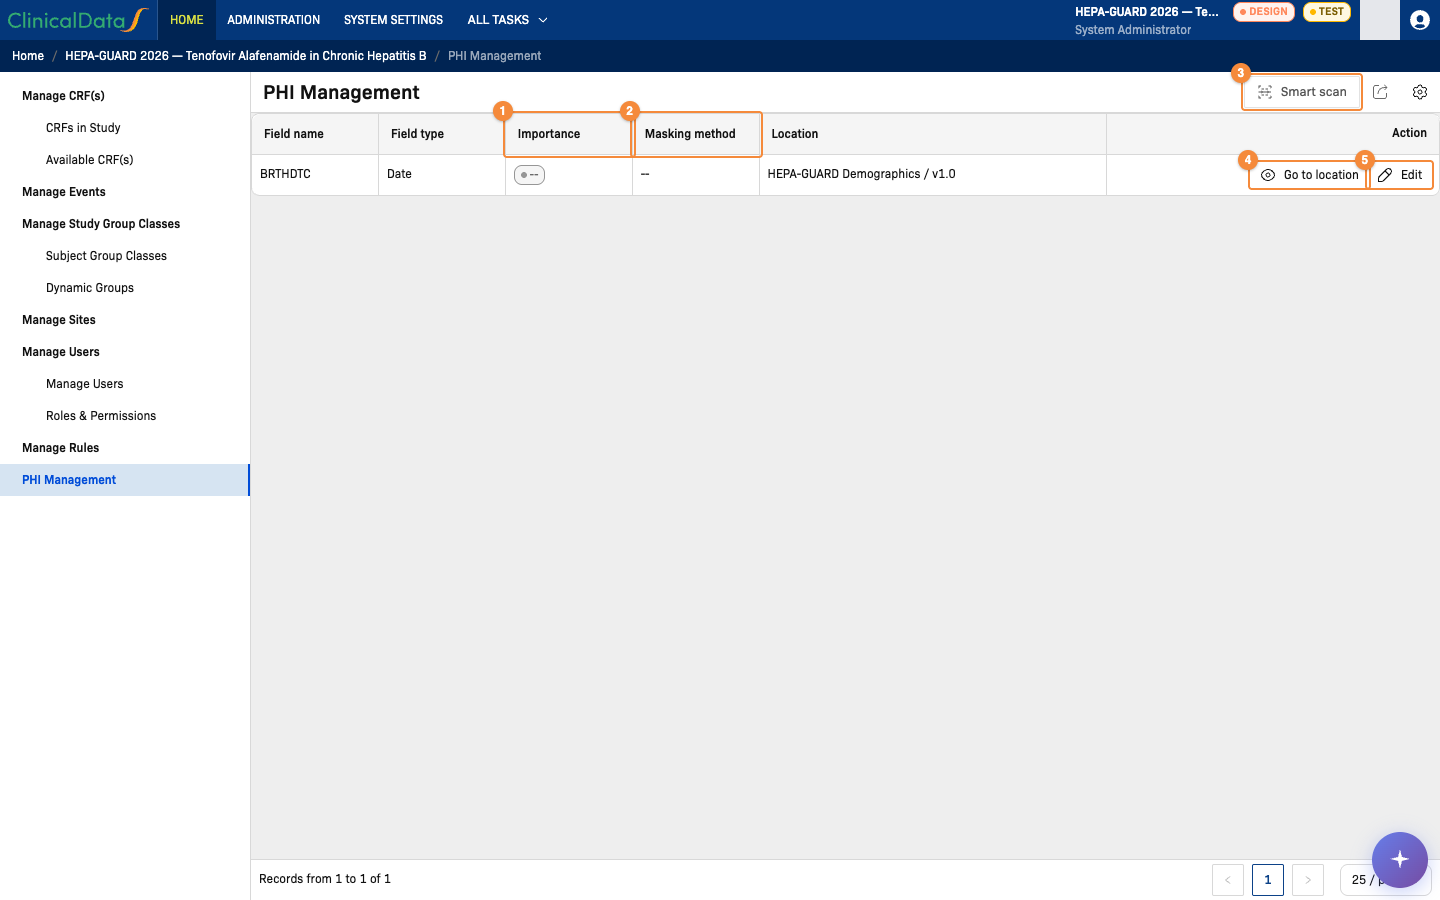
- Importance of the field
- Masking method assigned to the field
- Smart scan
- Go to location opens the place where the field is collected
- Edit opens the masking method drawer
Editing a Field's Masking Method
Choosing Edit on a row opens a drawer titled Edit PHI data, showing the field name and a set of masking-method cards — one per method allowed for that field's type. Each card shows the method's label, a short description, and an example of its output. Select one, then Save changes (or Cancel to close without changes).
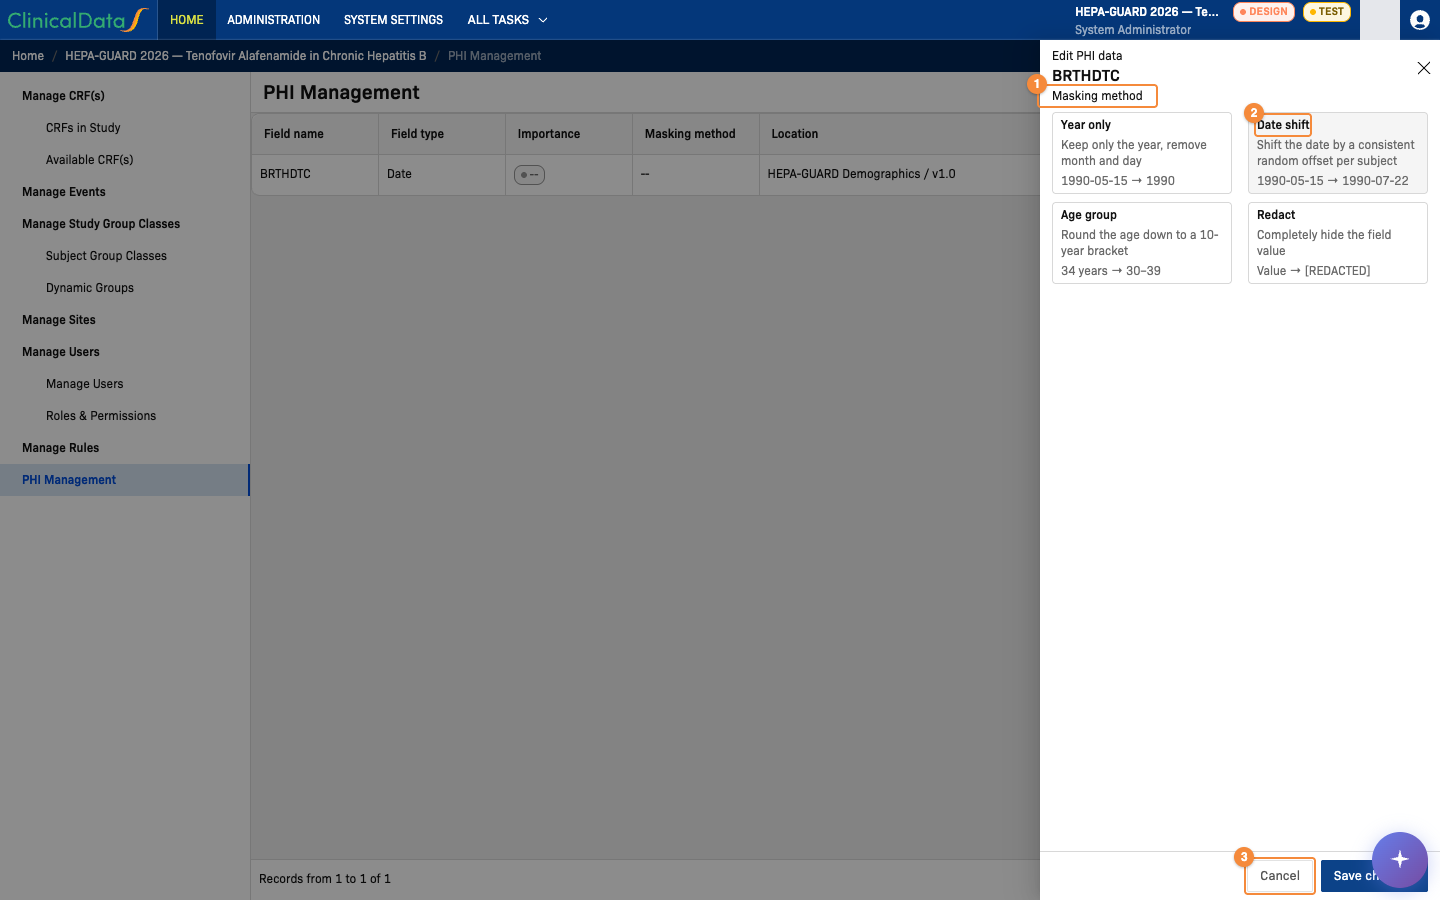
- Masking methods allowed for the field type, each with an example
- A masking method card: label, description and example output
- Cancel closes the drawer without changes
Smart Scan
Smart Scan searches the study's actual data for PHI that has not yet been reviewed on this page. It is reached from the Smart scan button in the PHI Management header, or from the Last scan chip next to it.
The Smart scan button is available only when PHI Smart Scan is enabled for the study in AI Hub. Otherwise the button is disabled, and its tooltip reads "PHI Smart Scan is not enabled for this study."
Running a Scan
Clicking Smart scan opens a modal that starts the scan immediately and shows an animated status while it runs. From this modal:
- Run in background closes the modal and takes you to the scan history list; the scan keeps running, and a notification appears once it finishes.
- Cancel only closes the modal — it does not stop the scan. The scan keeps running on the server, and its result is still available afterward from the scan history list.
- If the modal is left open until the scan finishes, it redirects automatically to that scan's result page.

What this should show: the Smart Scan modal mid-run, with the animated scanning indicator and the Run in background / Cancel buttons.
Scan History
Lists every Smart Scan run for the study, most recent first, with a Run new scan action in the header.
| Column | Description |
|---|---|
| Scan ID | The scan's identifier. |
| Run by | The user who started the scan (shown as System for a scan started other than manually). |
| Start | Date/time the scan started. |
| Duration | Elapsed time once the scan has a start and an end (for example 45s or 2m 30s); shown as a dash while still running. |
| Scanned | Number of fields the scan processed. |
| PHI found | Number of fields the scan flagged as PHI. |
| New / Processed | Reserved for a future breakdown of results by status; both currently always show a dash on this list — open the scan's result page for the actual finding counts. |
| Status | Requested, In progress, Completed, or Failed. |
Clicking a row opens that scan's result page.
What this should show: the Smart Scan history list with several completed scans, the Run new scan button, and the row for the most recent scan highlighted.
Scan Result
Opening a scan shows its result page, titled Scan result, with All scans and Run new scan actions in the header. What is shown depends on the scan's status:
- Completed — the full result: scan summary, tiles, and the findings table (below).
- Failed — a short message with a Retry action.
- Requested / In progress — a running indicator and a link back to the scan history list.
The scan summary shows the Scan ID, who ran it, Start and End times, Duration, and a Latest badge if this is the study's most recent scan.
Tiles (clicking one filters the findings table below it, except Fields Scanned):
| Tile | Meaning |
|---|---|
| Fields scanned | Total fields the scan processed, across Subject, Screening, Event, CRF, and Monitoring data. |
| PHI found | Total fields the scan flagged as PHI, and what percentage of scanned fields that represents. |
| New | Findings that still need a masking method set up on the PHI Field List. |
| Already configured | Findings that already have a masking method set up on the PHI Field List. |
| Low confidence | Findings that need manual review before you can be confident they are PHI. |
Findings table — filter by result (All / New / Configured / Low confidence, with counts), by source, or by a free-text field search; export the current view with Export CSV.
| Column | Description |
|---|---|
| Field | The field's label and code. |
| Source / Location | Which data area the field came from (Subject, Screening, Event, CRF, or Monitoring), plus its context (for example the CRF/event it belongs to). |
| PHI labels | The type(s) of PHI detected for this field (for example name, date, contact). |
| Confidence | A five-level confidence indicator. |
| Suggested masking | A suggested masking method for the field. |
| Status | New, Configured, Low confidence, or Dismissed. |
| Action | Go to location — CRF findings open CRF preview, Screening findings open Screening App Setting, and every other finding opens the Study Parameter Configuration tab of Study Setup. |
The Confidence and Suggested masking columns exist in the findings table but the platform does not currently supply a value for either — both always show a dash.
Status includes a "Configured" state for a finding that already has a masking method set up, but a freshly run scan currently only ever produces New or Low confidence findings — "Configured" is not something you will see appear on a scan result today.
Selecting a finding to apply its suggested masking directly from this table, and setting up Smart Scan to run on a recurring schedule, are not available yet. Today, use the finding's Go to location action and set the masking method from the PHI Field List above.
Scan Data Scope
A Smart Scan covers the entire study, across every subject — not only recently added data, and not limited to one subject. It examines Subject data, Screening data, Event data (including event location text), CRF item data, Discrepancy notes, and Monitoring notes.
What this should show: a completed scan's result page, with the scan summary, all five tiles, and the findings table with its filter row (result filter, source filter, search) populated.
Permissions
Viewing the field list, editing a field's masking method, and running or viewing Smart Scan are study configuration actions. Available to:Study AdministratorSystem Administrator(default roles — your study may differ) The page itself has no separate access check — any user who can reach it without one of these roles will have every request to load or change PHI settings rejected.
For the full permission list, see the Permission Matrix.
Related Docs
- Study Audit Logs — the other Data Compliance page, covering per-subject change history.
- System Settings — PHI Management — the system-wide masking parameter console (Age Group, Date Shift, Zip Prefix, Mask Last 4, Mask Phone), separate from this per-field page.
- Data Entry — Subject Information — where subject-level dynamic fields (including any marked PHI) are entered.