For the business definition, see CDS Surveys in Getting Started.
Access from Home → select your study → Survey (left sidebar).
Configuration URL:
https://[instance]/home/study/[studyId]/apps/survey
Replace [instance] with your environment host (for example, test-2025.clinicaldatas.net) and [studyId] with the study identifier.
Survey configuration requires the study to be in Design status. If the study is in Available, Locked, or Frozen status, the + Add a new Survey button is not shown and the table is read-only. To change study status, open the study home page and click Change Status.
Who uses this screen
Study administrators and study designers who are responsible for building the survey content and linking surveys to study events. If the Survey app is missing or the + Add a new Survey button does not appear, verify that:
- Your study role has the Survey app installed.
- The study is in Design status.
Typical workflow
- Open the study home page, confirm the status badge shows Design. If not, click Change Status and select Design, then click Submit.
- Navigate to Survey in the left app sidebar (or use the configuration URL above).
- The surveys table shows all existing surveys for the study. In a new study this is empty.
- Click + Add a new Survey at the bottom of the table.
- Complete the form:
- Basic information — enter a title and survey instructions.
- Survey Content — choose the stage, select the event (Enrollment phase only), and pick a CRF.
- Public URL — decide whether participants access the survey via a public link or receive an invitation.
- More settings — optionally configure access control, termination options, and email settings.
- Click Save. The survey appears in the table.
- If Public URL = Yes, a per-site URL is generated in the Public URL column. Share this URL with participants or embed it in communications.
Surveys table layout
The configuration page lists all surveys defined for the study. When no surveys have been created, the table shows an empty state with a + Add a new Survey button at the bottom.
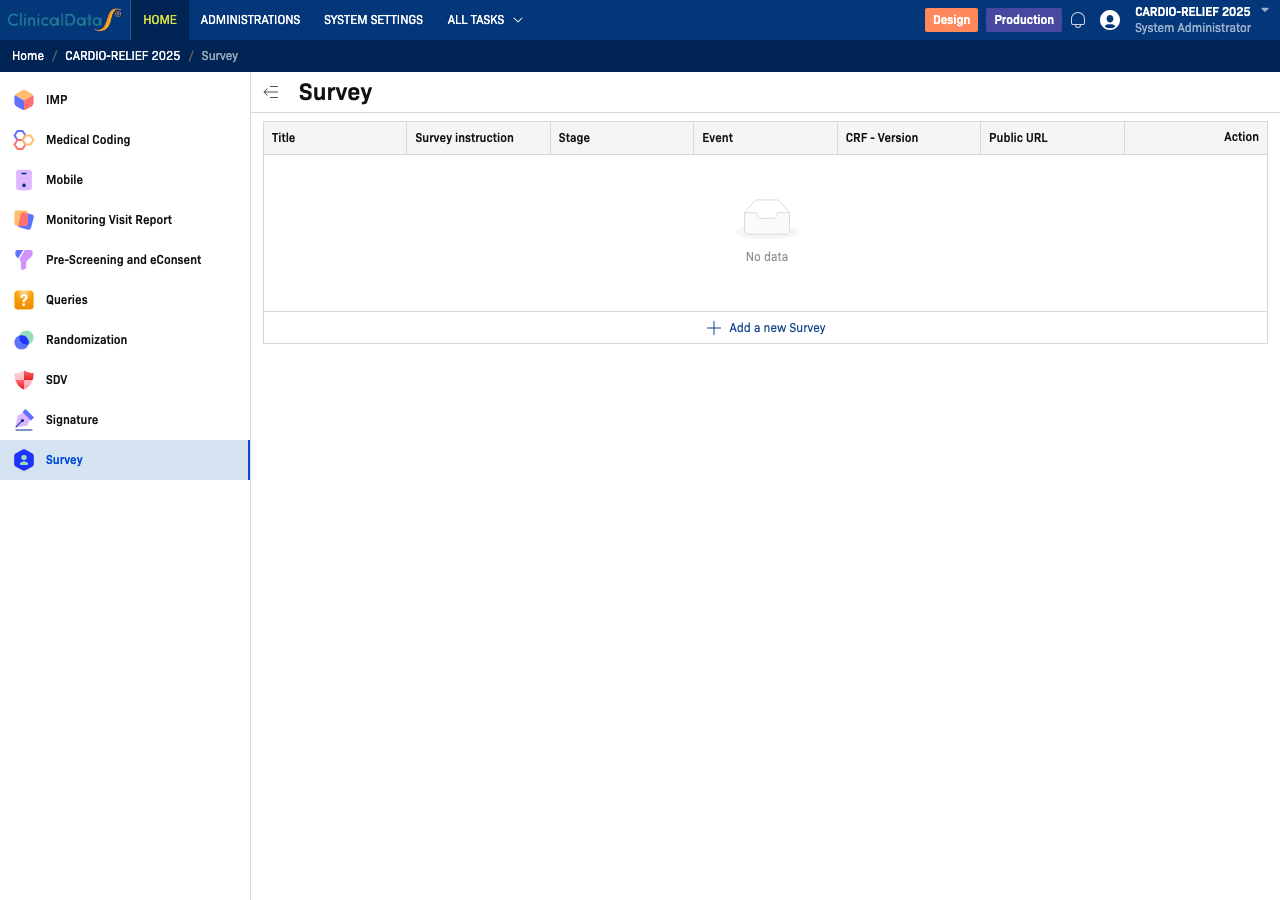
| Column | Description |
|---|---|
| Title | The survey name displayed to participants |
| Survey instruction | Instructions shown at the top of the survey |
| Stage | Either Screening or Enrollment phase — determines when the survey is applicable |
| Event | The study event the survey is tied to (Enrollment phase surveys only) |
| CRF - Version | The Case Report Form and version used to collect responses |
| Public URL | Yes if a shareable URL is generated per site; No if participants are invited |
| Action | Edit or delete the survey |
Adding a survey
Click + Add a new Survey to open the Add a new survey drawer. The form is divided into three sections plus an expandable More settings panel.
Basic information
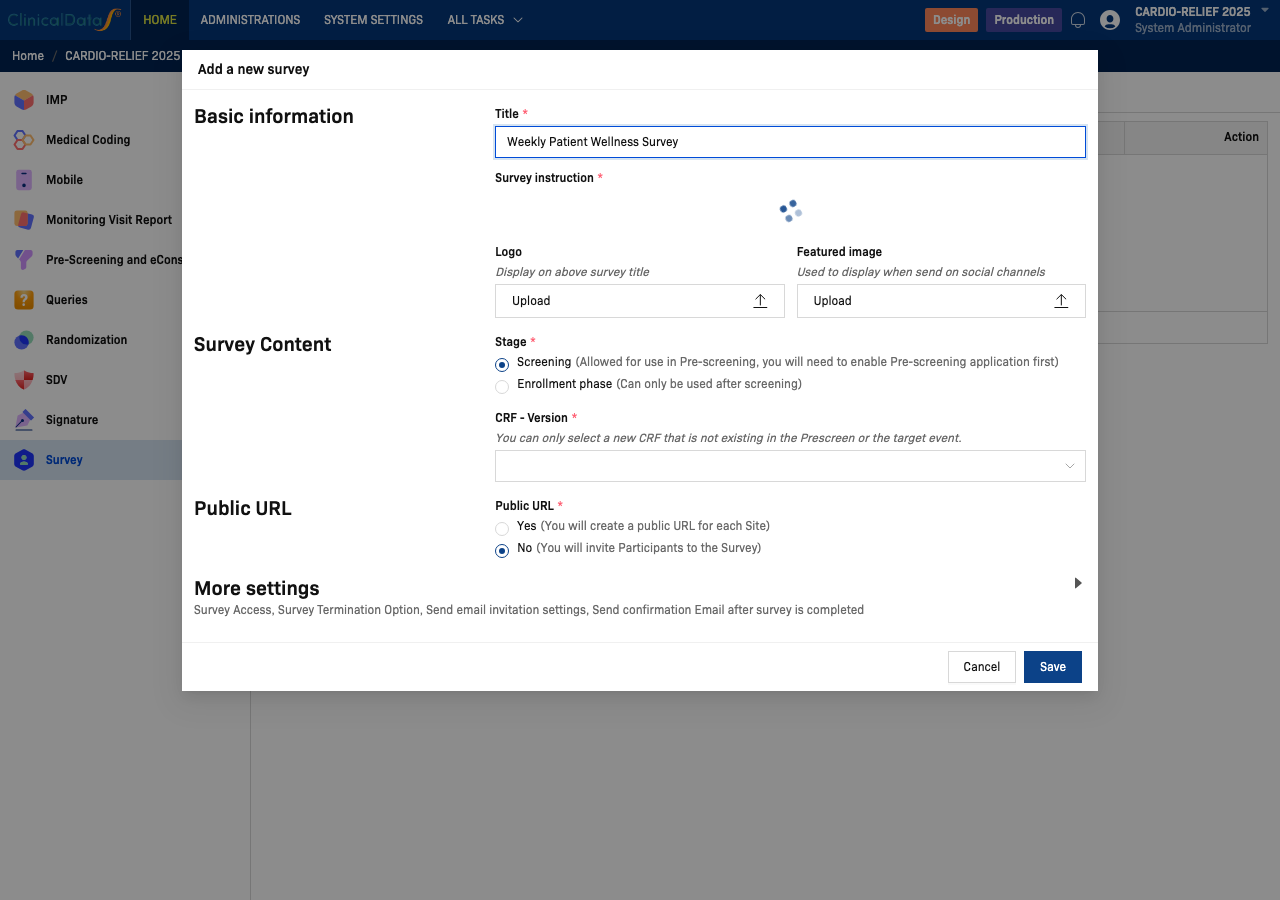
| Field | Required | Description |
|---|---|---|
| Title | Yes | The survey name shown to participants and in the surveys table |
| Survey instruction | Yes | Rich-text instructions displayed at the top of the survey. Use the toolbar for formatting, links, tables, and media. |
| Logo | No | Image displayed above the survey title. Upload a file. |
| Featured image | No | Image used when sharing the survey on social channels. Upload a file. |
Survey Content
The Survey Content section controls which stage and event the survey belongs to, and which CRF it uses.
Stage (required) — choose one of two radio options:
- Screening — the survey is used during pre-screening. You must have the Pre-Screening and eConsent app enabled in the study.
- Enrollment phase — the survey is used during a post-screening study event. Selecting this option reveals an Event dropdown and Position of survey field.
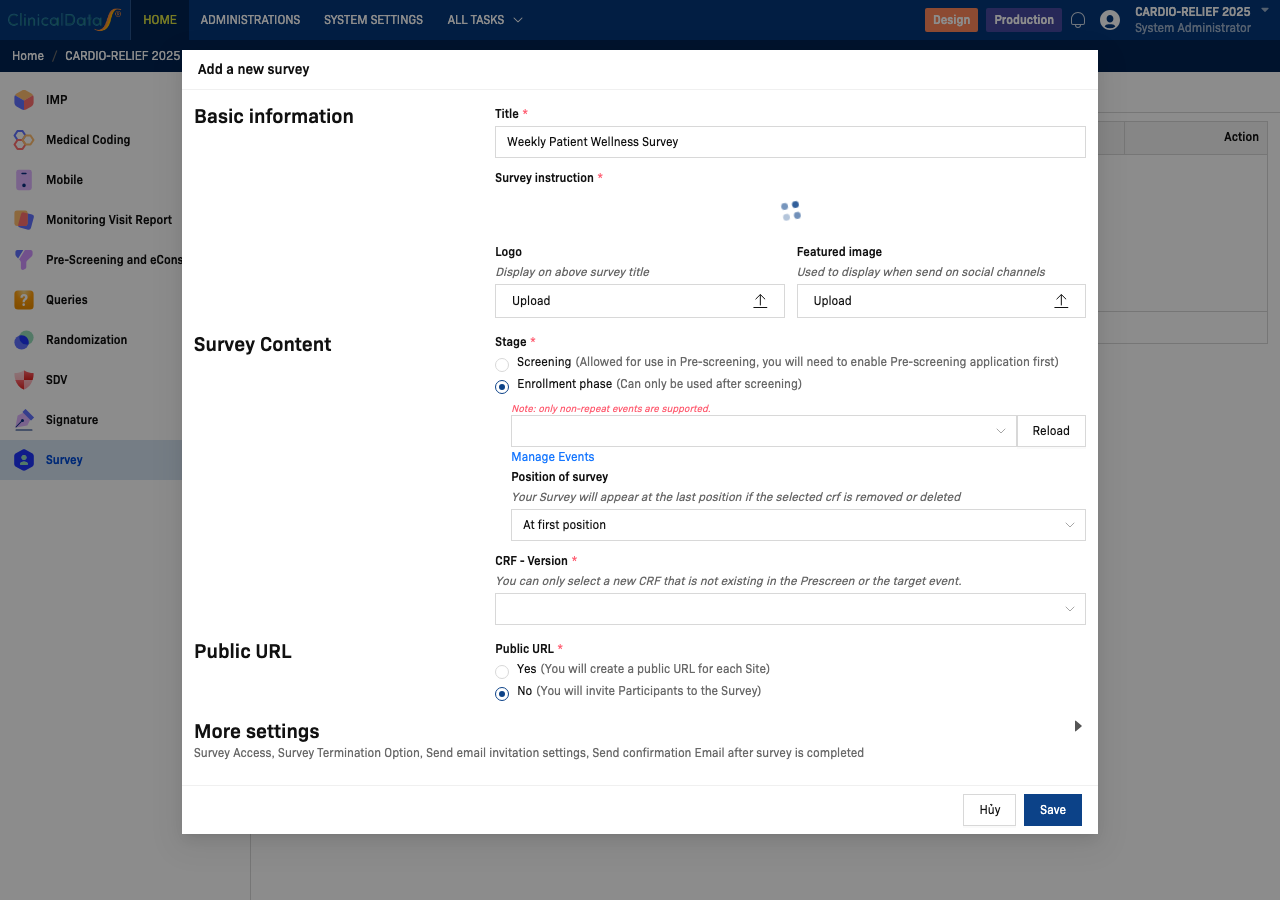
| Field | Stage | Description |
|---|---|---|
| Event | Enrollment phase only | Select the study event where this survey will appear. Only non-repeat events are listed. Use Manage Events to add or modify study events, or click Reload to refresh the list. |
| Position of survey | Enrollment phase only | Controls where this survey appears relative to other surveys in the same event. Default: At first position. |
| CRF - Version | Both | The Case Report Form (and version) used to capture participant responses. You can only select a CRF that is not already assigned to the Pre-screening or target event. |
Public URL
The Public URL section determines how participants access the survey.
| Option | Behaviour |
|---|---|
| Yes | A unique public URL is generated for each site. Participants open the URL in a web browser to complete the survey without logging in. |
| No | Participants are invited to the survey (for example, via a Survey Package). No public URL is generated. |
More settings
Click the More settings row to expand additional options:
- Survey Access — restrict who can open or submit the survey.
- Survey Termination Option — define conditions under which the survey ends early.
- Send email invitation settings — configure the invitation email sent to participants.
- Send confirmation email after survey is completed — configure the confirmation email sent on completion.
Relationship to other areas
Survey records that appear in the Surveys worklist (the Surveys tab of the CDS Surveys app) are driven by the surveys configured here combined with the Survey Package and Participant Group setup. If a survey does not appear in the worklist, verify that:
- The survey has been saved in this configuration page.
- A Survey Package includes the survey.
- A Participant Group has been assigned to the Survey Package.
See CDS Surveys workspace for the full worklist and configuration menu details.
Survey Package Scheduling
Configure automated delivery schedules for survey packages.
Schedule Types
| Schedule | Description | Example |
|---|---|---|
| Manual | Send on demand via Send button | Ad-hoc surveys |
| One-time | Send at a specific date and time | Baseline survey on Day 0 |
| Recurring | Send at regular intervals | Weekly PRO, monthly follow-up |
| Event-triggered | Send when a study event completes | Post-enrollment survey |
| Time-delayed | Send X days after an event | Day 7 follow-up after enrollment |
Configuring a Schedule
- Open or create a Survey Package
- In the Schedule section, select the schedule type
- Configure timing:
| Setting | Description |
|---|---|
| Start date | When the first send occurs |
| Interval | For recurring: daily, weekly, bi-weekly, monthly |
| End date / Occurrences | When the schedule stops |
| Time of day | Exact time the email is sent |
| Time zone | Study or participant time zone |
Trigger Events
When using event-triggered scheduling, select from:
- Enrollment — send when participant is enrolled
- Event Completion — send when a specific event is completed
- Randomization — send when participant is randomized
- Consent Signed — send when consent is obtained
Survey Branching & Conditional Logic
Configure survey flow based on participant responses.
Skip Logic
Skip questions based on previous answers:
- In the CRF builder, open the survey CRF
- Configure Skip Logic rules per item
- Example: If "Pain Level = 0" → skip "Pain Location" question
Branching
Direct participants to different sections based on responses:
- Configure Branching Rules in the CRF
- Define conditions and target sections
- Test all branches in Design mode before publishing
Show/Hide Logic
Show or hide items based on conditions:
- Show when — item appears only when conditions are met
- Hide when — item is hidden when conditions are met
- Always show — item is always visible (default)
Related topics
- CDS Surveys workspace — Participant Surveys worklist, Participant Group, and Survey Package
- CDS Mobile App — Participants can also complete surveys via the ClinicalDataS mobile app
- Pre-Screening and eConsent — Required when using the Screening stage for surveys