For the business definition, see Monitoring Visit in Getting Started.
Configure the Monitoring Visit module before report operations begin. Changes take effect immediately — existing reports are not affected.
Path: Home → Study → Monitoring Visit
Configuration Sections
The configuration screen has two sections:
- Visit Configuration — Define settings per visit type
- Site Branches — Manage branch information for each site
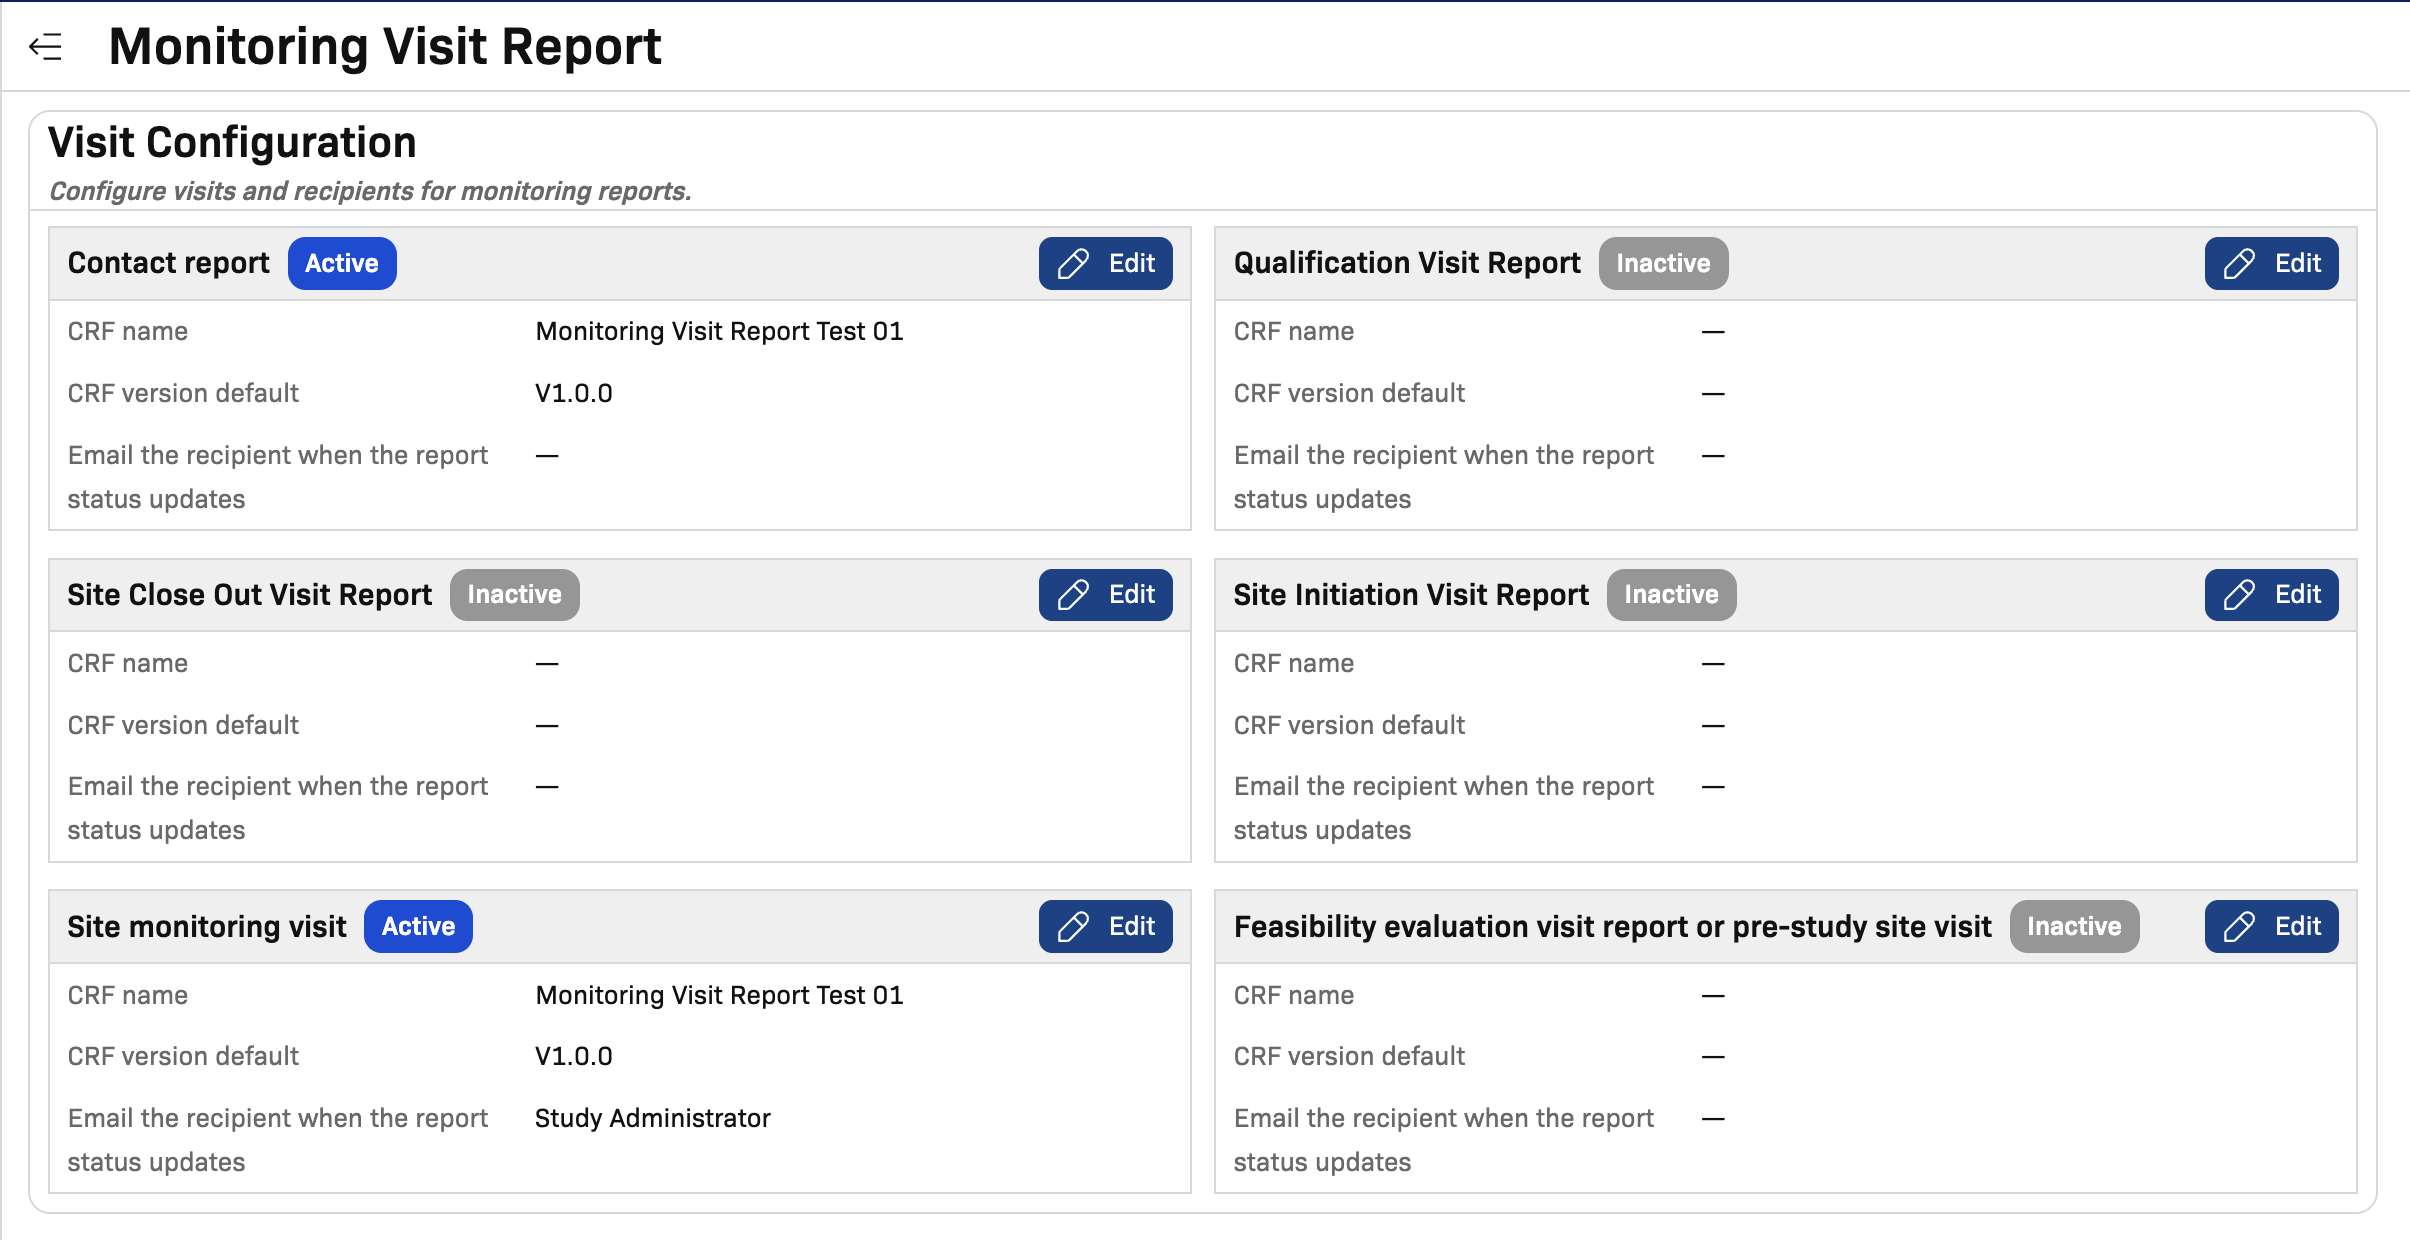
Configure Visit Types
Each visit type has its own card (e.g., Contact Report, Site Monitoring Visit, Qualification Visit Report, Site Initiation Visit Report). Click Edit on a visit type to configure it.
Visit Configuration Fields
| Field | Description | Required |
|---|---|---|
| Active switch | Enable or disable the visit type | Yes |
| Visit name | Display name used in dashboard and report creation | Yes |
| CRF name | CRF used as the report template | Yes |
| CRF version default | Default CRF version for new reports | Yes |
| Email recipients on status update | Role-based notification recipients | Recommended |
| Specific people | Additional email addresses (separated by semicolons) | Optional |
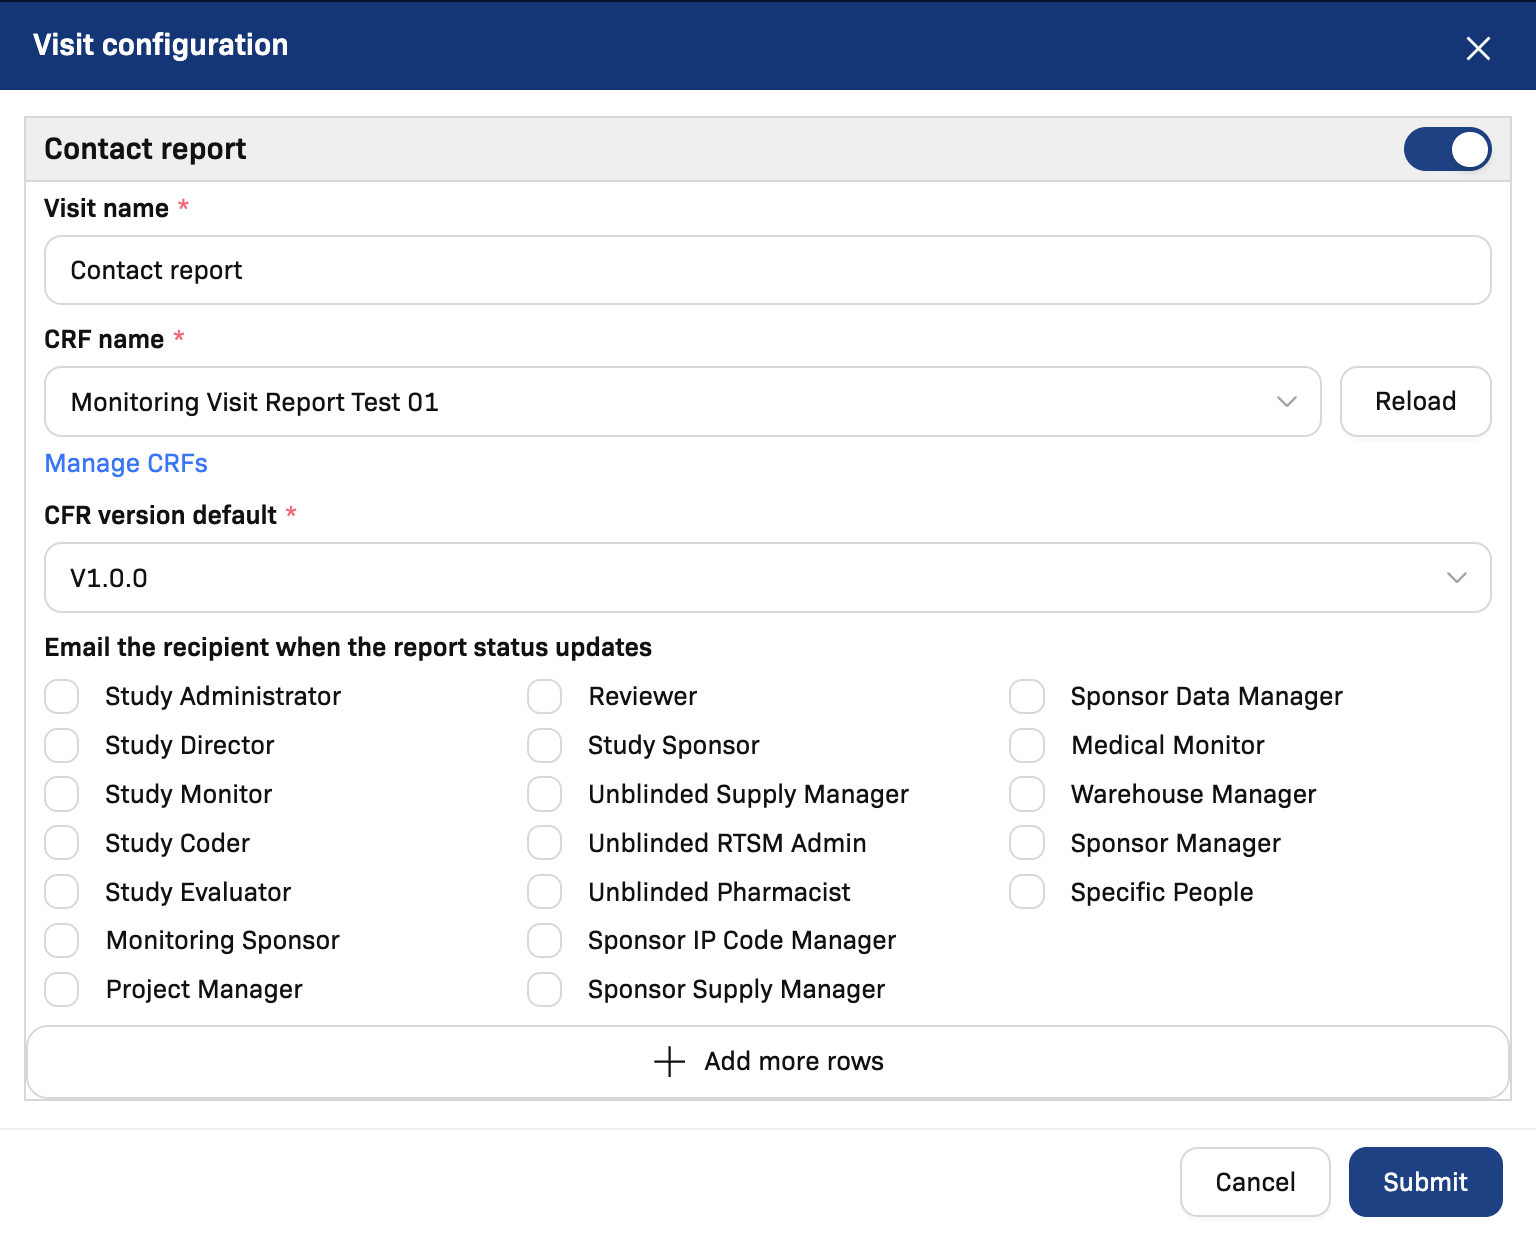
If CRF name or CRF version default is missing for an active visit type, users cannot create new reports for that visit type.
Notification Behavior
Email recipients receive notifications when a report changes status. Best practice:
- Include operational roles for Draft/Completed transitions (CRA, Reviewer)
- Include sponsor-facing roles for Reviewed/Finalized/Approved transitions
- Use Specific people only when role-based recipients aren't sufficient
Configure Site Branches
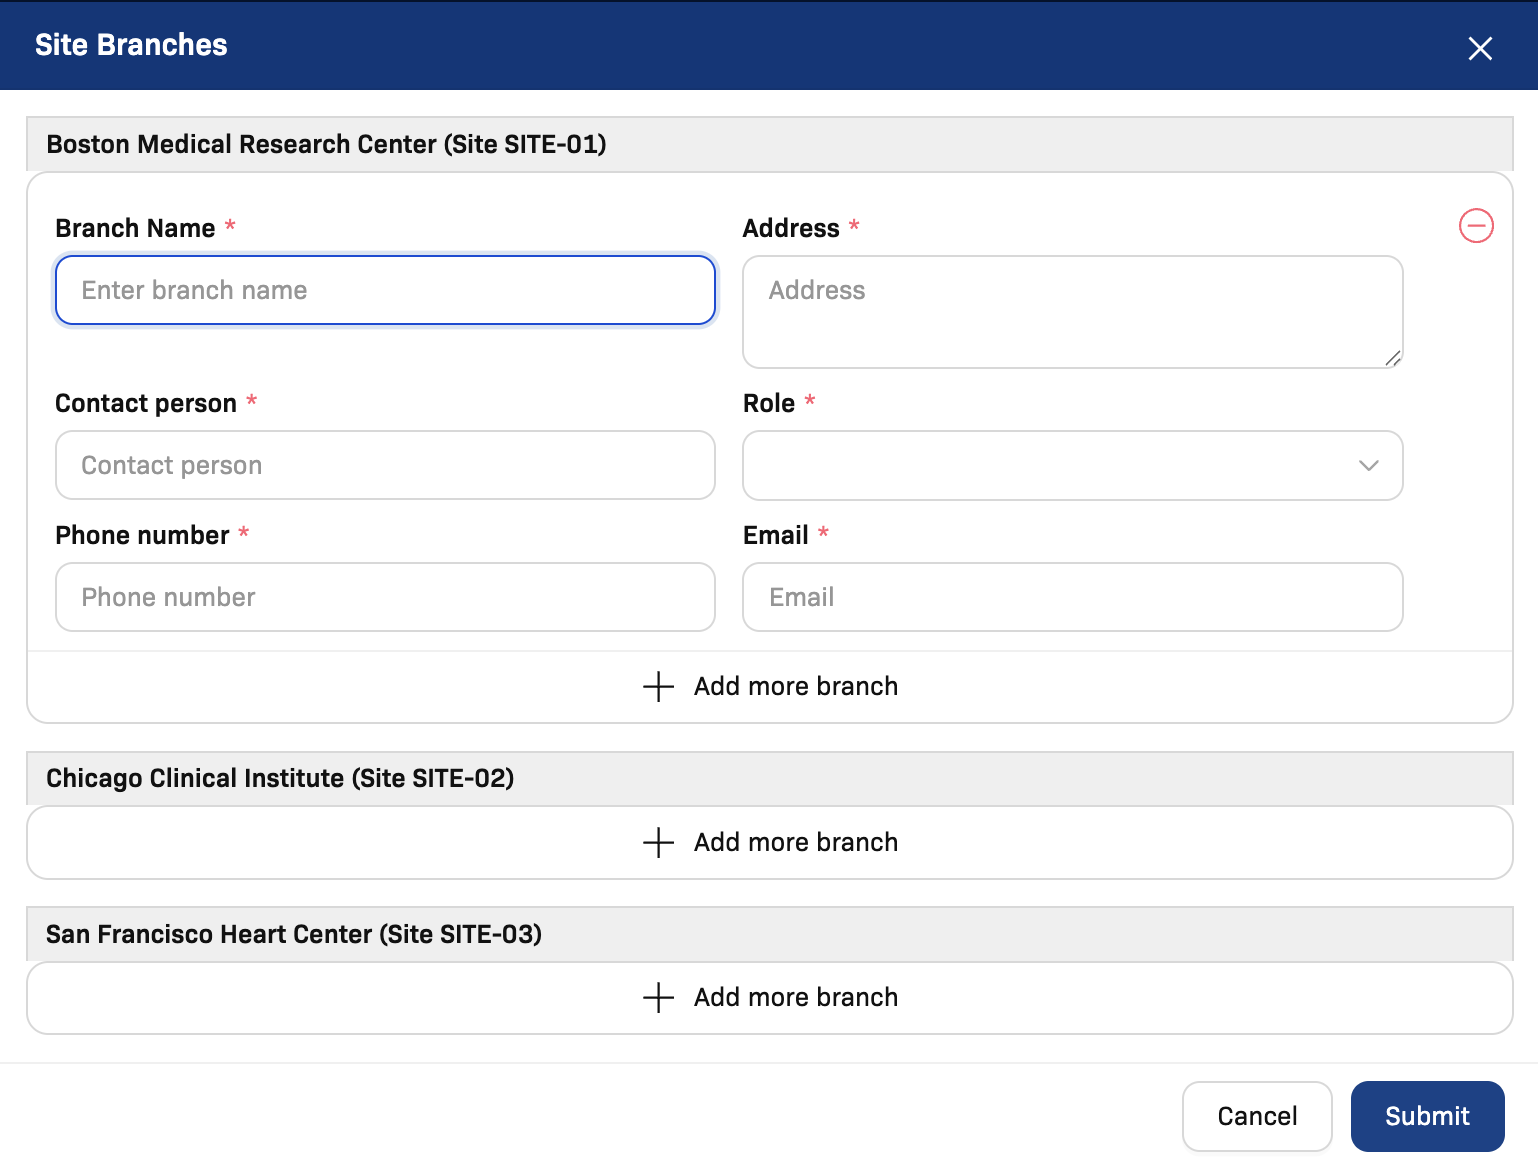
Click Edit in Site Branches to open the branch dialog. Use Add more branch to register additional locations per site.
| Field | Purpose |
|---|---|
| Branch name | Identifies the location in reports |
| Branch address/contact | Supports communication and traceability |
Visit Dependency Rules
Control the order in which visit types can be created to enforce your monitoring plan.
Typical Visit Sequence
| Phase | Visit Types | Dependency |
|---|---|---|
| Start-Up | Site Qualification Visit (SQV), Site Initiation Visit (SIV) | SQV before SIV |
| Active Monitoring | Site Monitoring Visit (SMV), Contact Report | SIV before SMV |
| Close-Out | Site Close-Out Visit (COV) | All SMVs completed |
Setting Dependencies
- In Visit Configuration, click Edit on a visit type
- Under Dependency Rules, set:
- Prerequisite Visit Type — which visit must be completed first
- Prerequisite Status — minimum status required (e.g., Approved)
- Block Creation — prevent new reports if prerequisites aren't met
- Click Submit
Example Rules
| Visit Type | Prerequisite | Min Status | Effect |
|---|---|---|---|
| Site Initiation Visit | Site Qualification Visit | Approved | Cannot create SIV until SQV is approved |
| Site Monitoring Visit | Site Initiation Visit | Approved | Cannot create SMV until SIV is approved |
| Site Close-Out Visit | Site Monitoring Visit | Finalized | Cannot create COV until at least one SMV is finalized |
When rules are configured, the Add Report button is disabled for blocked visit types. Users see a warning when attempting to create a report without meeting prerequisites.
Issue Templates
Standardize findings by defining templates per visit type. Templates pre-fill common issue attributes so monitors spend less time on classification.
Creating Templates
- In Visit Configuration, click Edit on a visit type
- Under Issue Templates, define each template with:
- Name — descriptive label
- Category — Protocol, GCP, Documentation, Consent, Safety, Process, Data
- Default Level — High, Normal, Low
- Default Type — Deviation, Waiver, Violation
- Description Template — pre-filled finding text
- Suggested Action — recommended corrective action
- Click Submit
Notification Rules
Define who gets notified for key monitoring events.
| Event | Suggested Recipients |
|---|---|
| Issue assigned | Issue owner |
| Issue due soon | Issue owner, Study Manager |
| Issue overdue | Issue owner, Study Manager |
| Response received | Report author (CRA) |
| Issue closed | Report author, Study Manager |
| Report submitted | Reviewer |
| Signature requested | Authorized signers |
Configuring Notifications
- In Visit Configuration → Edit, under Email recipients on status update
- Select role-based recipients for each transition
- Add individual emails under Specific people (separated by semicolons)
- Enable Daily digest to send summaries of overdue actions to Study Managers
Report Configuration
Each visit type also has report-level configuration:

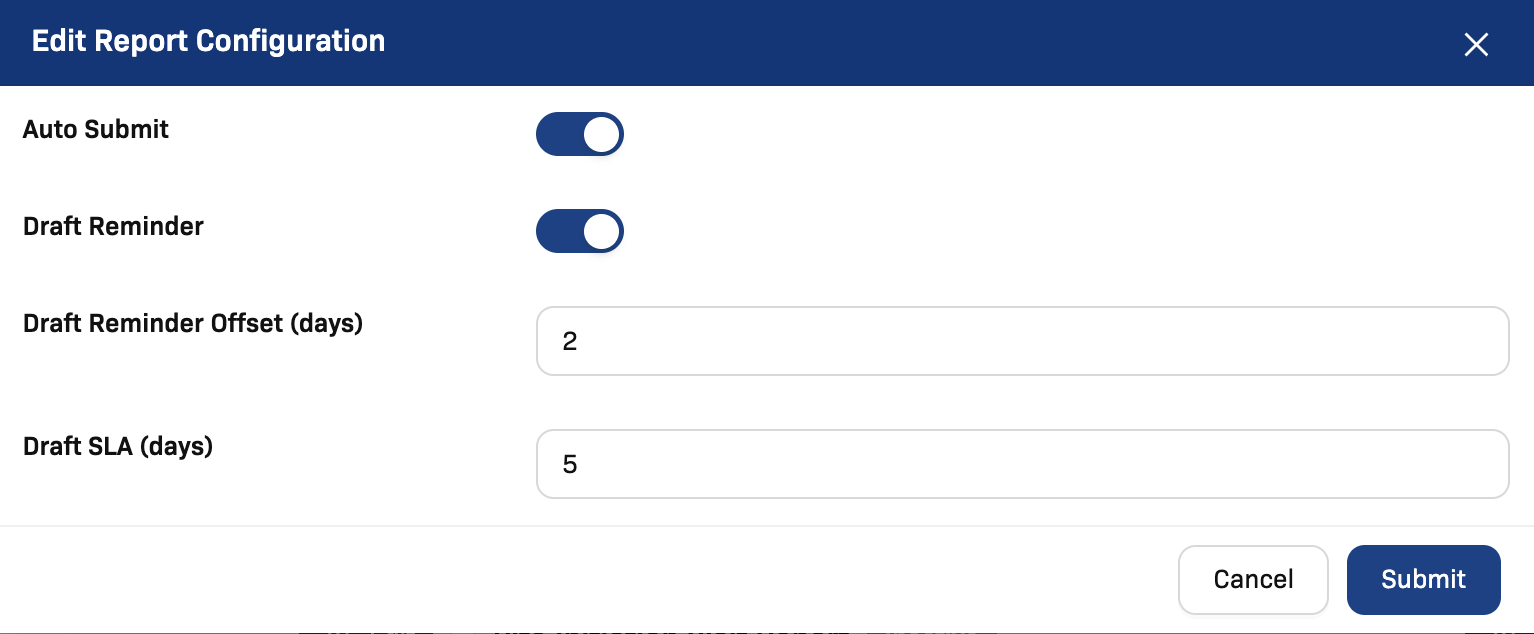
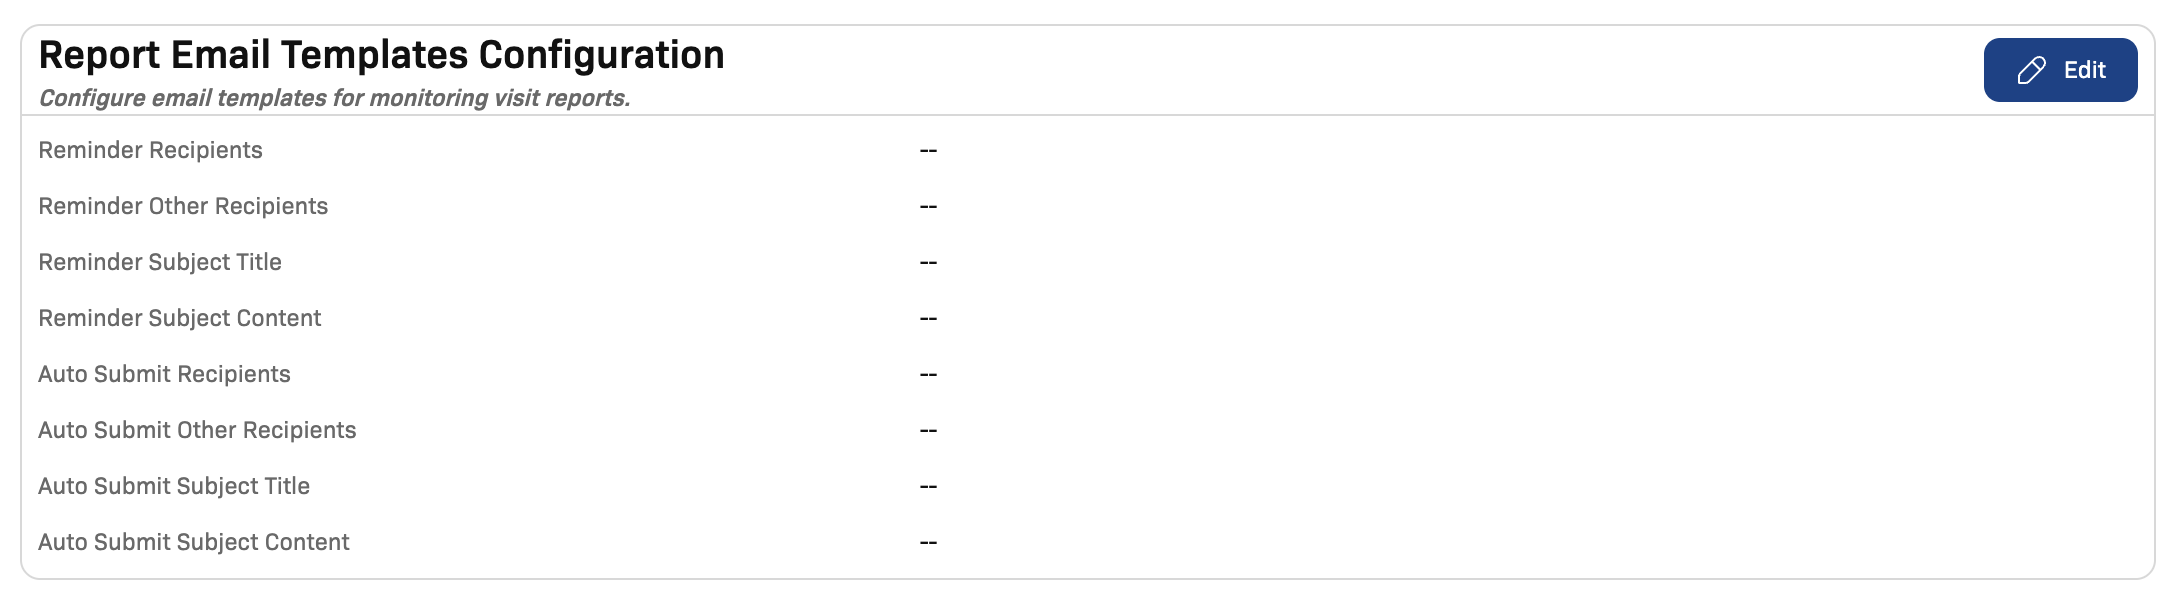
Email Templates
Customize notification emails per visit type:
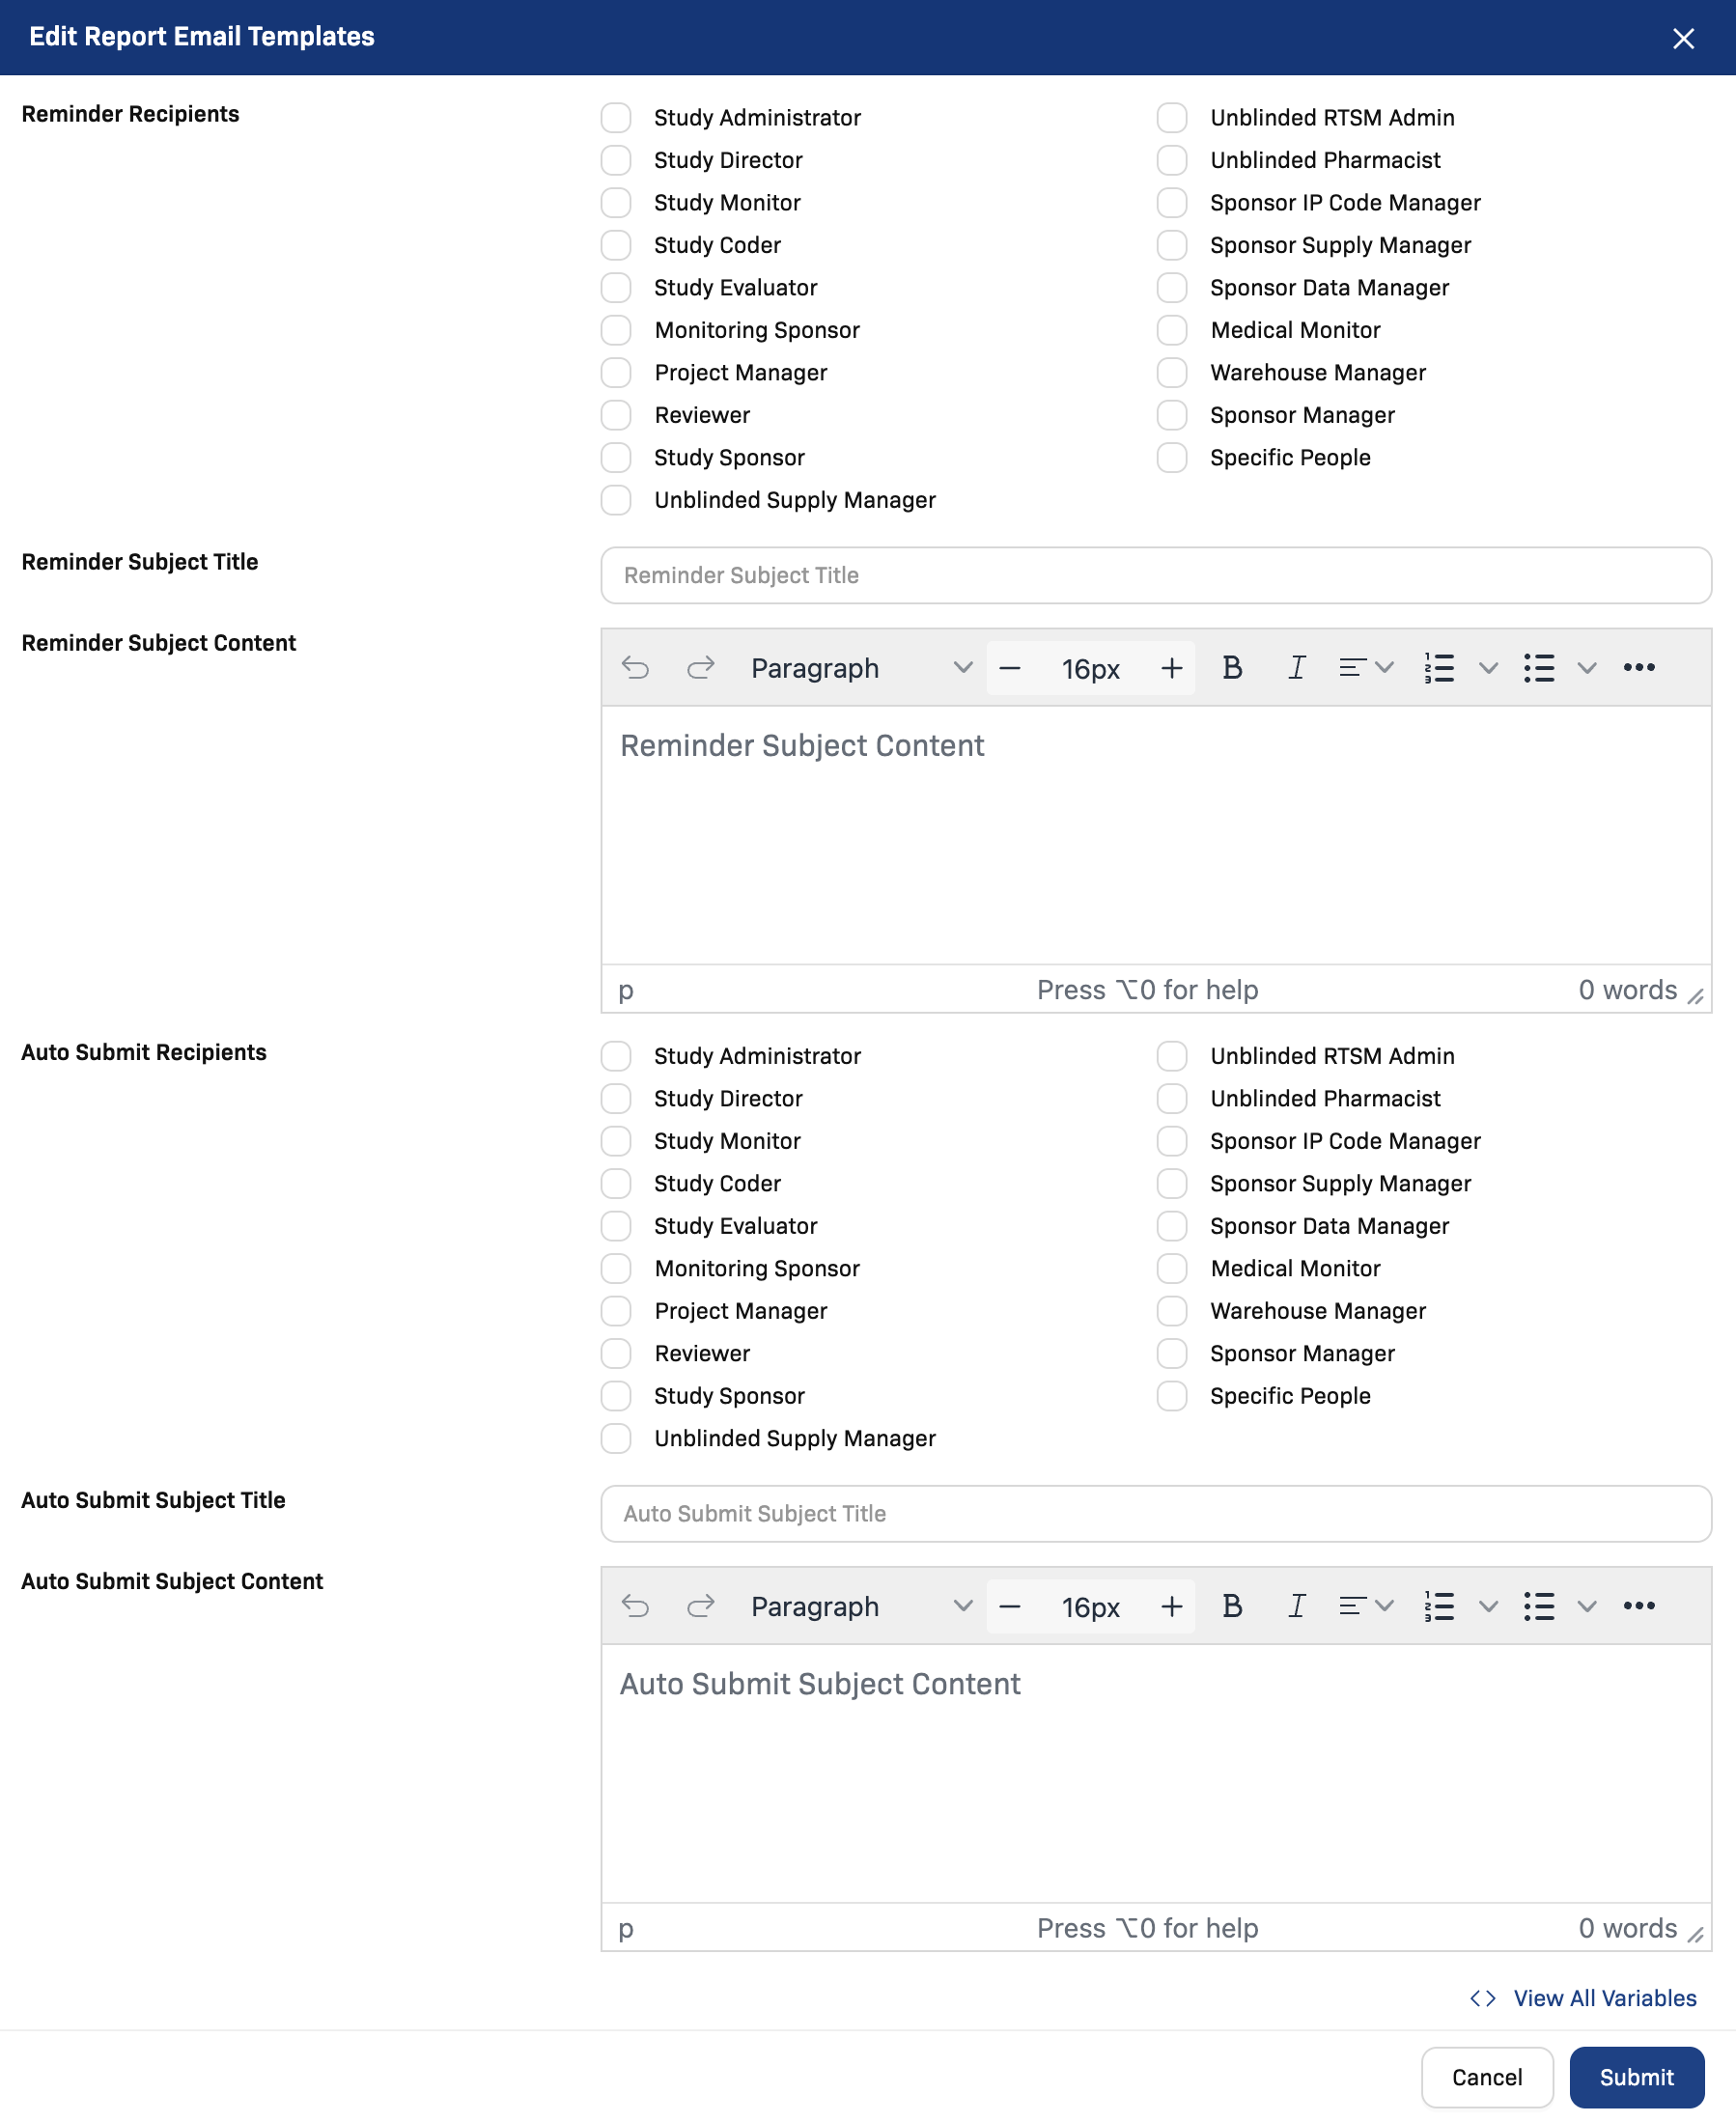
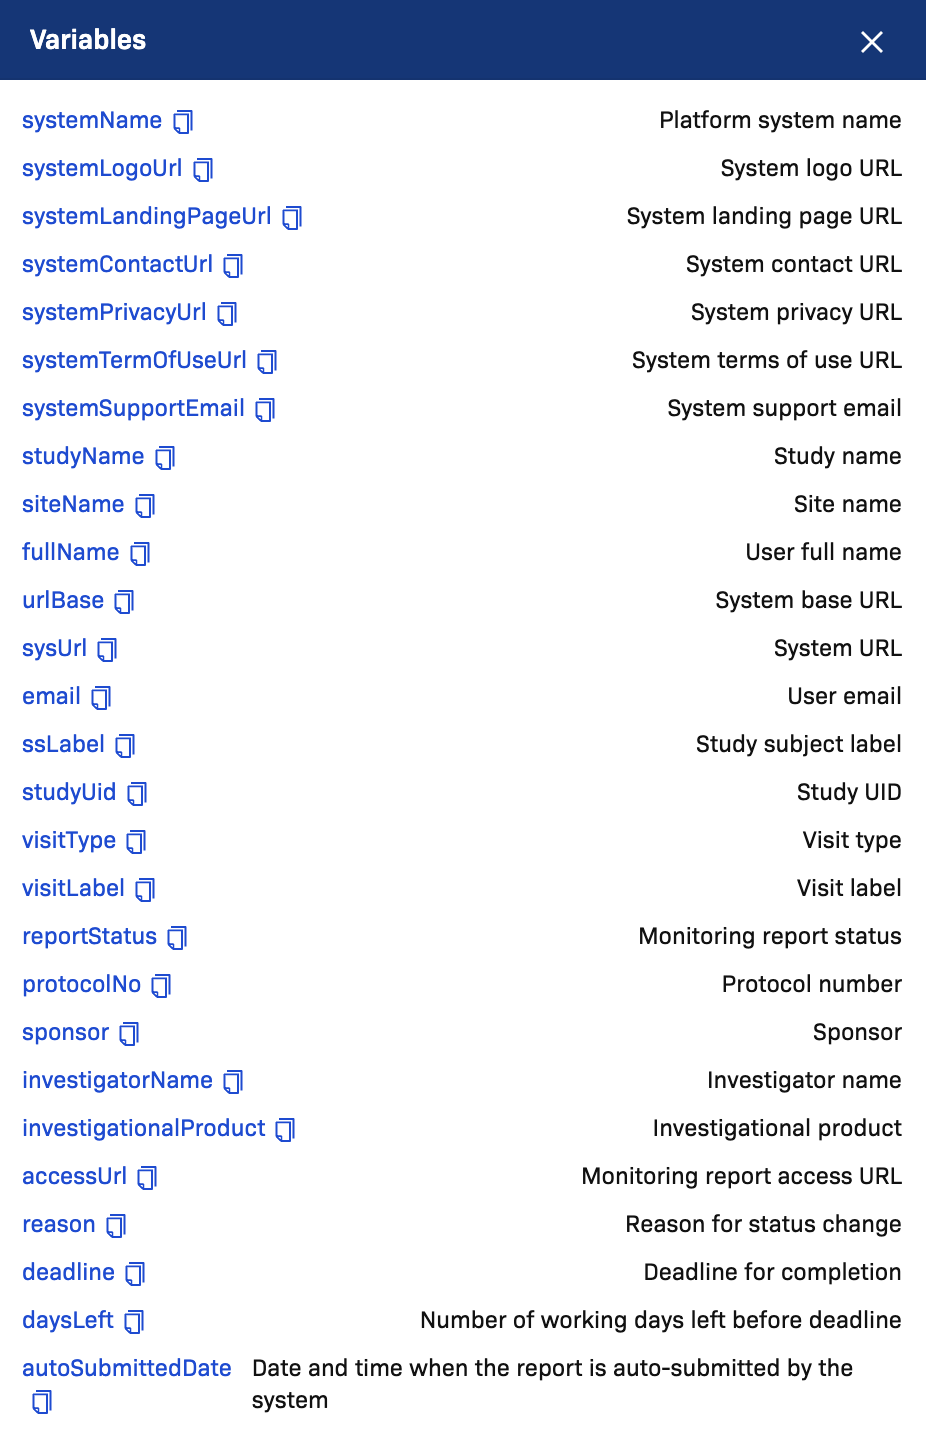
Use template variables to personalize content:
E-Signature Configuration
Enable e-signature to meet compliance requirements for report approval.
- Go to App Setting → Monitoring Visit → E-Signature
- Configure:
- Require e-signature for report approval — enforce signing before Approved status
- Capture IP and device metadata — record signer context in audit trail
- Record hash/snapshot — store report content hash at signing time
- Reopen requires approval — enforce approval for post-signature edits
- Click Submit
Pre-Sign Checks
Before signing is permitted, the system verifies:
- All required report sections are completed
- No critical issues remain unresolved
- All mandatory fields are filled
- Signer has the appropriate role permission
SDV Integration
Configure how Monitoring Visit SDV status syncs with the EDC module.
- Go to App Setting → Monitoring Visit → SDV Integration
- Configure:
- Sync SDV status to EDC — bidirectional status updates
- SDV Delta View — show differences between current and previous visit SDV
- Risk-based sampling — enable subject selection strategies (random, high-risk, overdue)
- Click Submit
SDV statuses flow: not started → partial → completed → not applicable. Updates from Monitoring Visit appear on EDC dashboards within the configured sync interval.
Recommended Setup Order
- Enable only the visit types your monitoring process uses
- Assign a CRF and default version for each active visit type
- Configure notification recipients for each status transition
- Review site branches and add any missing entries
- Set up visit dependency rules if your process requires sequencing
- Configure issue templates to standardize findings
- Enable e-signature if required by your compliance process
- Verify by creating a test report and walking through the workflow