Data Entry
Opening a subject's event (visit) presents a form menu for that event. Depending on the study's configuration, this menu can include up to three entry types in addition to the event's CRFs:
| Entry | Appears when | What it's for |
|---|---|---|
| CRF | Always, for every CRF assigned to the event | Recording the clinical data collected on that form |
| Randomize | The study has Randomization installed and the subject has not yet been randomized for this event | Checking eligibility and performing the randomization |
| IMP | The study has IMP installed and a product is configured for this event | Recording IP dispensing for the subject |
A study that also uses the Survey app may show additional Survey entries in the same menu; see Surveys for that app.
A subject also has a separate Subject Information form (personal data, collected once per subject rather than per event), and each event carries its own Parameters (operational fields such as start date, end date and location). Both are described below.
CRF Data Entry
Opening a CRF from the event's form menu presents the form for data entry.
Field types
A CRF can present a mix of the following field types, depending on how it was designed:
- Short text and long text (multi-line) fields
- Date fields
- Single-choice fields (radio buttons) and multi-choice fields (checkboxes)
- File attachment fields
- Calculation fields — read-only values computed automatically from other fields on the form (for example, a BMI value computed from Height and Weight)
Some fields are organized into a repeating layout rather than presented individually:
- Group — a repeatable block of several fields treated as one record (for example, one row of concomitant medication details).
- Table — a repeatable row of a few short fields (for example, one row per prescription line).
- Matrix — a fixed list of questions answered against one shared response scale (for example, a symptom questionnaire where every item uses the same 0–3 severity scale). Unlike Group or Table, the rows in a Matrix are not something the user adds more of — they are the form's fixed set of questions.
Issues panel
The right-hand Issues panel lists validation problems for the form's fields, split across two tabs:
- Errors — failed field validations and rule violations that block completion.
- Warning — rule-based warnings that do not block completion.
Clicking an item in either tab scrolls the form to that field.
Previous form / Next form
The Previous form and Next form arrows at the bottom of the form move between the forms assigned to the subject in sequence — across CRFs within the same event, and from one event into the next — without returning to the subject's full record each time.
Save
- Save — available on every CRF; saves the form's current data.
- Save as Partial / Save as Complete — offered in the save menu when the study has Partial Data Entry enabled. Use Save as Partial to record in-progress data without marking the CRF Completed; use Save as Complete once all required fields are answered.
- Save as Completed — the save button of a CRF that is already Completed. Saving a change on a completed CRF requires a Reason for Change (below).
Source Data Verify / Un-Verify (Source Data Verification)
Source Data Verify and Un-Verify record CRF-level Source Data Verification (SDV) — confirming the entered data against source documents. This is separate from signing (below): a CRF can be verified without being signed, and vice versa.
- Shown only for a Completed CRF, on a study with Source Data Verification installed.
- Verifying and un-verifying are available to the Site Monitor, Study Monitor, Study Administrator, and System Administrator roles by default.
- Verifying is blocked while the CRF has open queries, unless the study allows SDV with open queries.
Sign Form / Un-sign Form
Sign Form and Un-sign Form apply the CRF's electronic signature — a separate action from Source Data Verify/Un-Verify above.
- Shown only for a Completed CRF, on a study with Electronic Signature installed.
- Signing and un-signing are available to the Clinical Research Coordinator, Investigator, Study Administrator, and System Administrator roles by default.
- Signing is blocked until the CRF's Source Data Verification (where required) is complete and its queries are closed.
Reason for Change
Editing a CRF that is already Completed requires entering a Reason for Change — a short explanation of why the data is being corrected. This explanation is saved with the edit and appears in the subject's Audit Logs.
Attachments
Uploading a file to a CRF's file attachment field requires the right to update subject records:
Available to:Clinical Research CoordinatorInvestigatorStudy AdministratorSystem Administrator(default roles — your study may differ)There is no Lock/Unlock action at the individual CRF level. Locking applies to the whole visit — see Visit Detail.
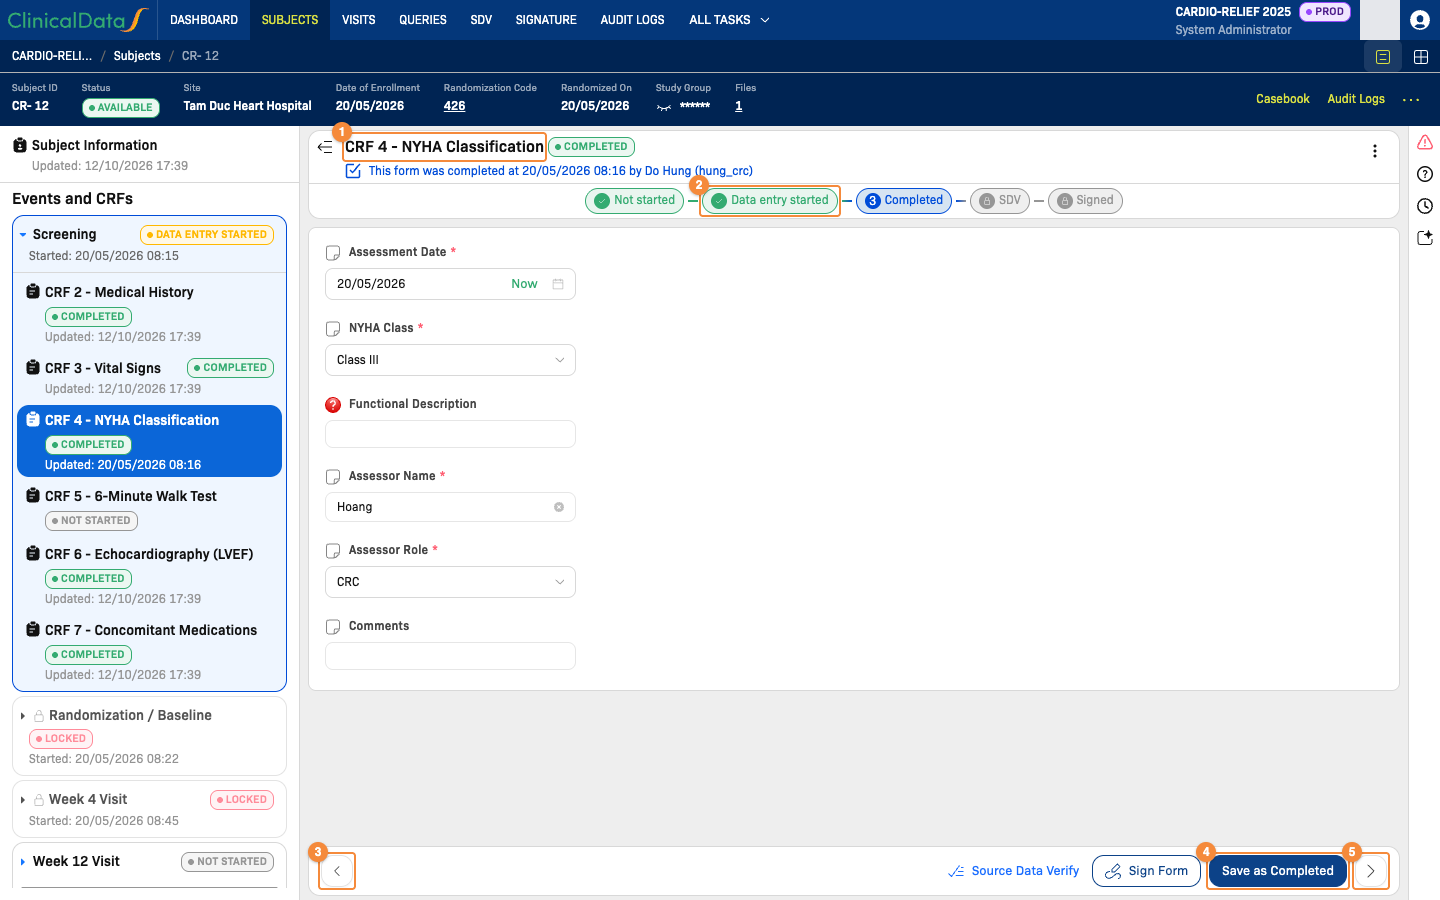
- CRF name and status
- Status steps of the CRF: Not started, Data entry started, Completed, SDV, Signed
- Previous form
- Save the CRF; on a completed CRF the button reads Save as Completed
- Next form
The icons on the right edge of the form open the side panels, including the Issues panel. Source Data Verify and Sign Form appear in the footer for roles that hold these rights.
Subject Information
Subject Information is the subject's personal data form — one per subject, reached from the Subject Information link at the top of the subject's sidebar rather than from an individual event.
This form is built dynamically from Study Setup: it is not a fixed set of fields. It is configured under Study Setup, Study Parameter Configuration tab, Collect Personal Data section (only shown when the study has personal data collection enabled). That section lists 20 system fields — Full Name, First Name, Middle Name, Last Name, Address, Birthday, Phone Number, Email, Fax Number, Gender, Ethnicity, Education Level, Medical Record Number, Identity Number, Citizen Identity Number, Social Security Number, Health Plan Beneficiary Number, Passport Number, Bank Account Number, and Certificate or License Number — each with its own control set to Required, Optional, or Not used, plus an editable label for that field.
A separate More Personal Data section lets the study define additional custom fields beyond this fixed list.
Only the fields actually set to Required or Optional appear on a given study's Subject Information form, under the label configured for them — the field set is not the same across studies.
Configuring Subject Information is available to the Study Administrator and System Administrator roles by default, and the study must be in a configurable state.

What this should show: the Subject Information data entry form for a subject, showing a mix of Required and Optional fields with their configured labels, alongside the Study Setup "Collect Personal Data" configuration screen used to produce it.
Event Parameters
An event carries its own operational data, separate from its CRFs. On the subject's record, selecting an event shows it in the Parameters card — start date and time, end date and time, and location — with Edit:
- The start date, end date and location fields are configured study-wide under Study Setup, Event Parameter Configuration tab (including each field's label and whether it is required).
- Further settings are made per event definition, in the Advanced Settings step of the event setup wizard (opened from Manage events when creating or editing an event):
- Completion Rule — when the event becomes Completed: All Required CRFs Complete, All CRFs or Manual.
- Attachments — whether files attached to the event are Required, Optional or Not Used.
- Email Notification — sends an email to the configured recipients when the event is created or updated.
- Collect More Dynamic Data — defines additional fields to collect on the event.
Where a study collects this data, it is stored as part of the event's own record, alongside the event's CRFs.
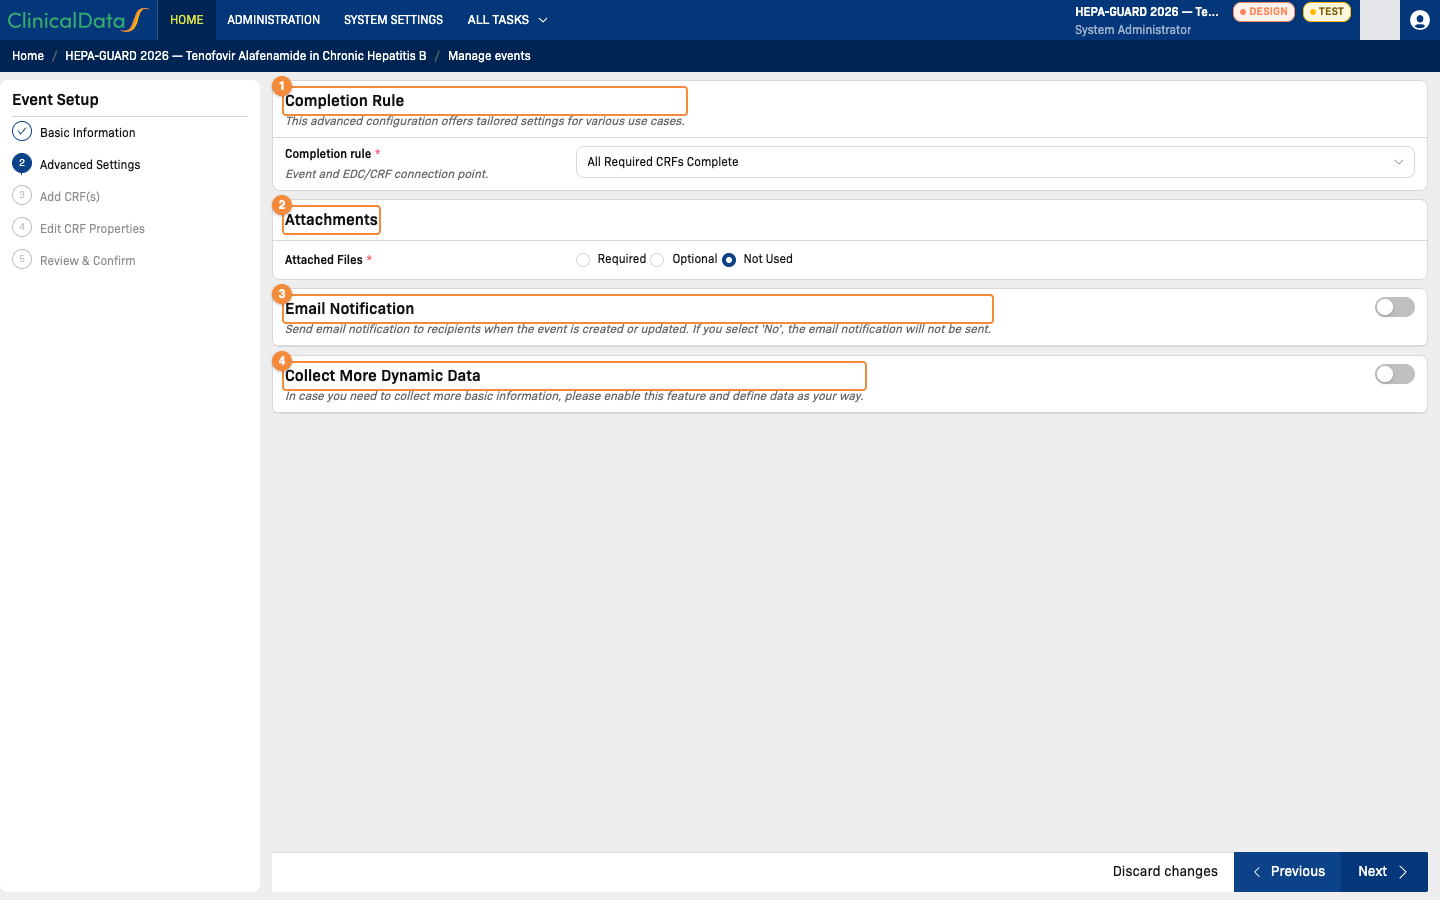
- Completion rule of the event
- Whether attachments are required, optional or not used
- Email notification when the event is created or updated
- Additional fields collected on the event
Randomization
For studies using Randomization, an event that has not yet been randomized shows a Randomize entry in its form menu, separate from its CRFs. Opening it presents the inclusion/exclusion and stratification questions and performs the randomization once they are satisfied.
Once a subject is randomized, a read-only summary of the randomization (Randomization Code, Randomized On, Study Group) is also available in the subject's Casebook view.
This guide only summarizes how Randomization appears alongside CRF data entry. For the full step-by-step flow — eligibility checks, submitting a randomization, reading the result, and error handling — see Randomize a Subject.
What this should show: an event's form menu with a Randomize entry alongside its CRFs, and the read-only randomization summary as it appears in the Casebook view.
IMP Dispensing — Randomization mode
For studies using IMP in Randomization mode, the event's form menu includes an IMP entry. It presents:
| Field | Description |
|---|---|
| Date | The dispense date |
| Created By | The user recording the dispense |
| IP | Read-only; populated by clicking Generate, which assigns the subject's next available serial-numbered kit |
| Notes | Free-text notes |
| Attachment | A separate, repeatable section for dispense-related documents |
Generate is disabled until the subject has been randomized and the form's other fields have been submitted, and is available only to roles that can dispense IMP — by default the Clinical Research Coordinator, Investigator, Site Pharmacist, Study Administrator, and System Administrator roles. Clicking it only assigns the kit and creates a dispense request — a separate Dispense confirmation on the Transfer → Dispenses list is still needed before the kit is recorded as given to the subject.
This is a summary of where IMP dispensing sits relative to CRF data entry. For the full two-step dispense workflow — generating the kit here, then confirming or reporting an issue on the Transfer → Dispenses list — see Dispenses — Randomization Mode.
What this should show: the event's IMP entry in Randomization mode, with Date, Created By, the disabled IP field, Notes, and the Generate button (both enabled and disabled-with-tooltip states).
IMP Dispensing — PSP mode
For studies using IMP in PSP (Patient Support Program) mode, the same IMP entry in the event's form menu instead presents Date, Created By, and Notes, together with a product table. The table's shape depends on the study's configured Tracking method — one row per product for By Lots or No tracking, or a serial-number list for By Unique Serial Number.
For the full dispense workflow, including editing an existing dispense and the required Reason for change, see Dispenses — PSP Mode.
What this should show: the event's IMP entry in PSP mode, with Date/Created By/Notes and the product table for a By Lot–tracked product.
Related Documentation
- AI Data Entry Assistant — the AI Chat panel available in the right sidebar while entering data on a CRF, IMP, Randomize, or Survey form
- Subject Detail — the subject record this data entry is reached from
- Visit Detail — the event-level overview
- Randomize a Subject — the full randomization flow
- Dispenses — Randomization Mode and Dispenses — PSP Mode — the full IMP dispense workflows