Overview
The SDV Events page is your main workspace for performing source data verification. It has two tabs:
- View by CRF — a queue of CRFs pending item-level verification. Start here.
- View by Subject — an aggregate view showing SDV completion status per subject.
To open SDV, go to your Study Home and click the SDV card in the Installed Apps section.
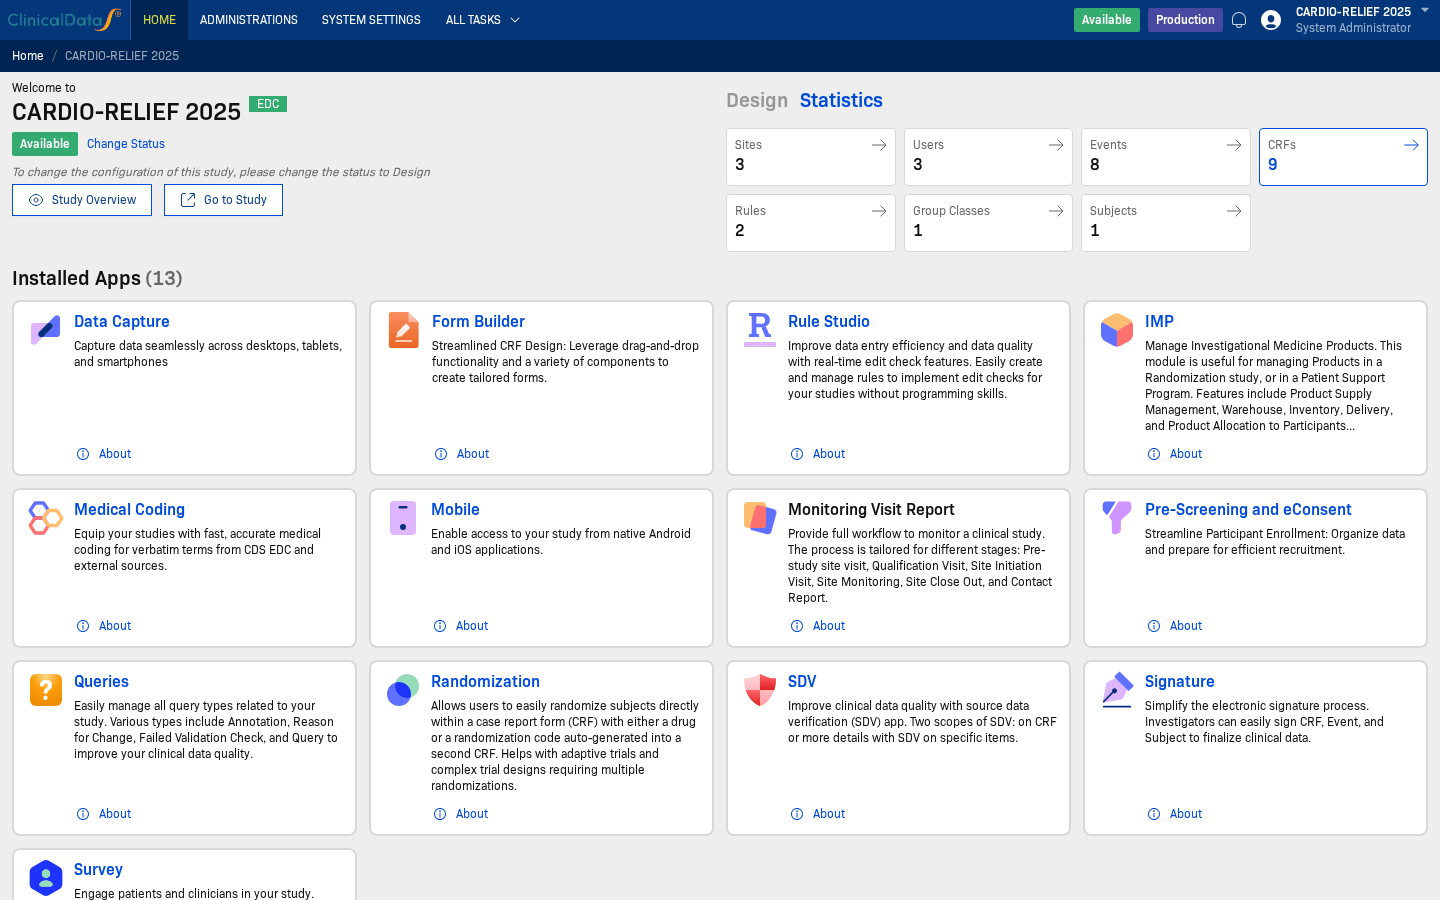
After entering the study workspace, you can also access SDV at any time from the SDV link in the top navigation bar.
View by CRF
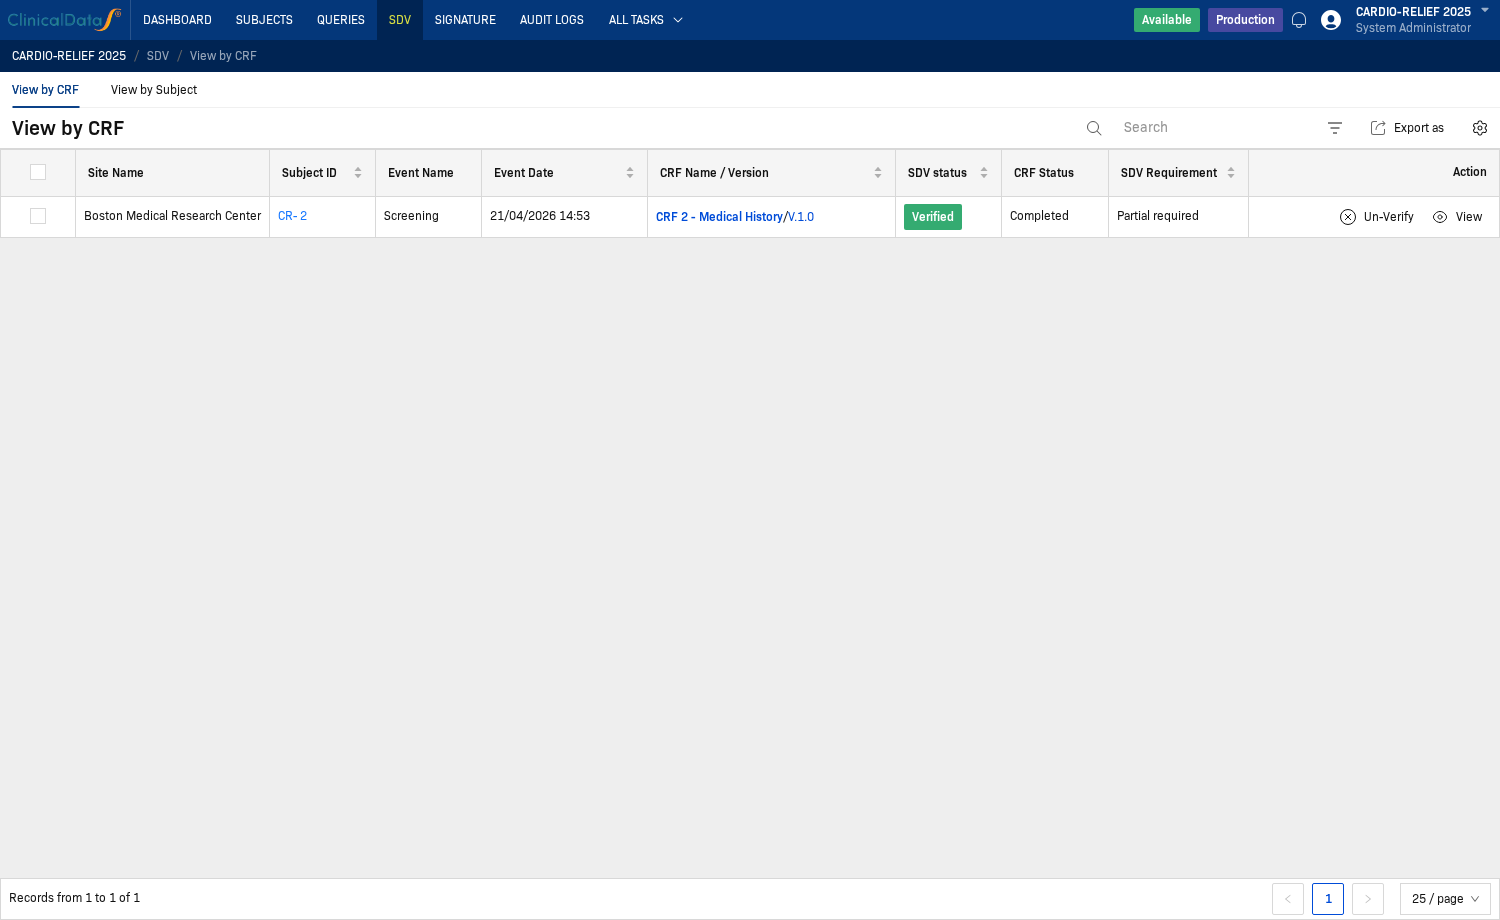
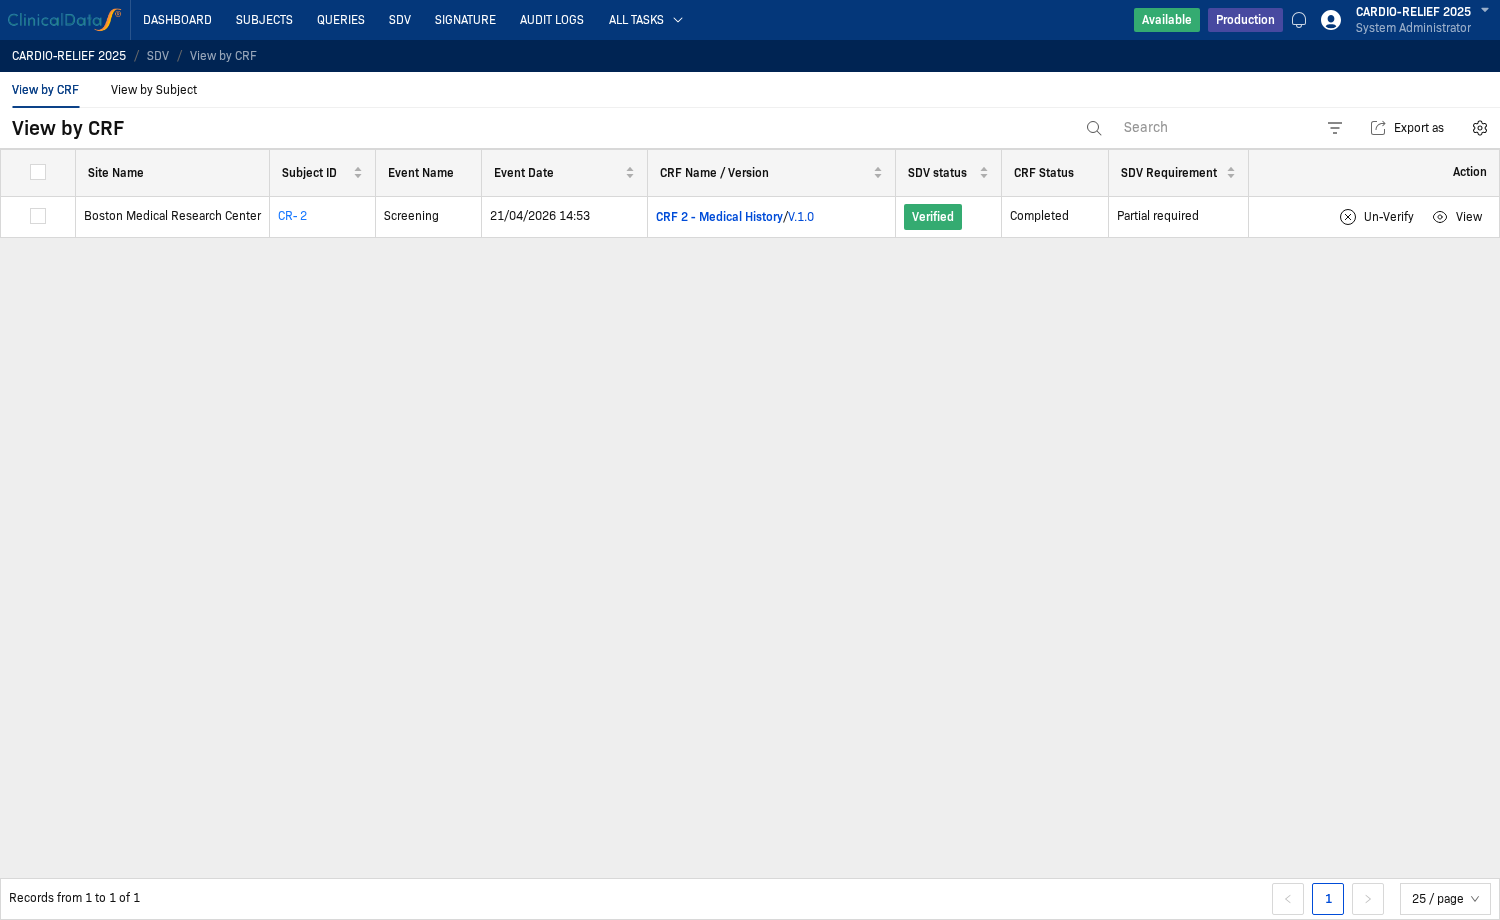
View by CRF lists every CRF in scope for SDV. Each row represents one CRF for one subject and event.
Columns
| Column | Description |
|---|---|
| Site Name | Site the subject belongs to |
| Subject ID | Subject identifier (clickable — opens the subject) |
| Event Name | Study visit or event |
| Event Date | Date of the event |
| CRF Name / Version | CRF in scope — click this link to open the CRF for verification |
| SDV status | Current SDV status: Not done, Verified |
| CRF Status | Data entry status: Completed, Data entry started, etc. |
| SDV Requirement | How much must be verified: Partial required, All required |
| Action | Available actions: Un-Verify, View |
View by Subject
View by Subject shows aggregate SDV status per subject. Use this tab to monitor overall SDV completion after CRF-level work is done, or to perform subject-level verification when all CRF requirements are met.
Columns
| Column | Description |
|---|---|
| Subject ID | Subject identifier |
| SDV status | Aggregate SDV status for the subject |
| Site Name | Assigned site |
| Subject Status | Subject workflow status |
| # of Completed CRFs | Number of CRFs with Completed status |
| # of Verified CRF SDVs | Number of CRFs with SDV Verified status |
| Total Available CRFs | Total CRFs in scope |
| Action | Available actions — Verify Subject appears when all CRF requirements are met |
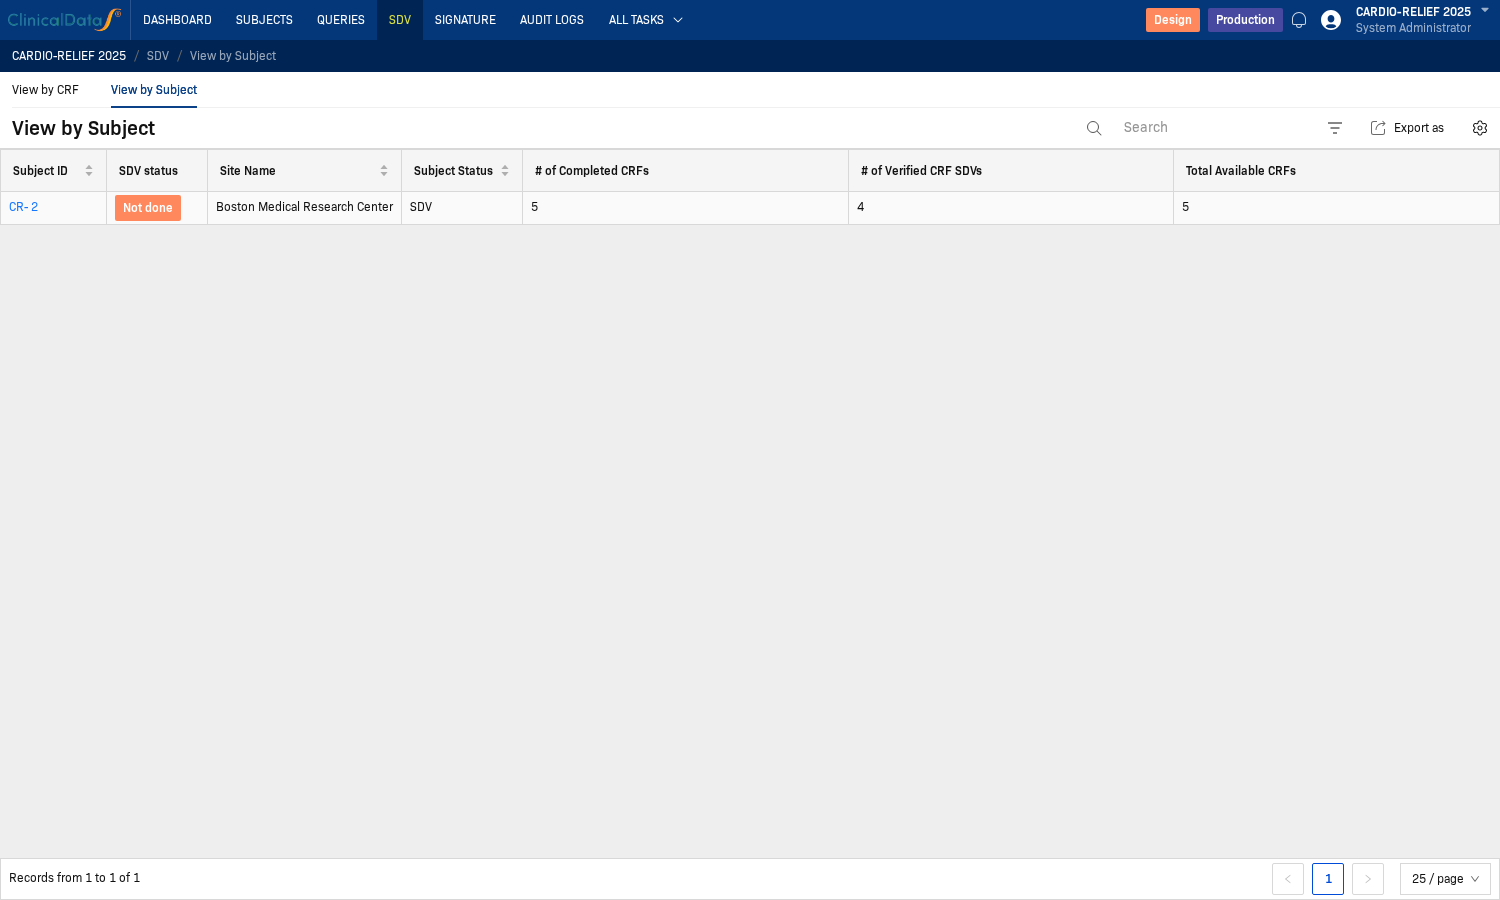
View by Subject may show No data while View by CRF still has rows to process. Subject aggregate rows appear only when subject-level SDV conditions are fully met. Complete all required CRF-level verifications in View by CRF first.
How to verify a CRF
Step 1: Open your study and navigate to SDV
On the study home page, find the Installed Apps section and click the SDV card.
Step 2: Find the CRF in View by CRF
The SDV workspace opens on View by CRF by default. Find the row for the CRF you want to verify.
Use the Search bar or filter by SDV status Not done to focus on pending items.
Step 3: Open the CRF from the queue
Click the CRF Name / Version link in the row. This opens the CRF in SDV verification context.
You must open the CRF by clicking the CRF Name / Version link from the View by CRF row. If you open the same form by navigating through Subjects directly, the verification buttons will be disabled (greyed out and unclickable).
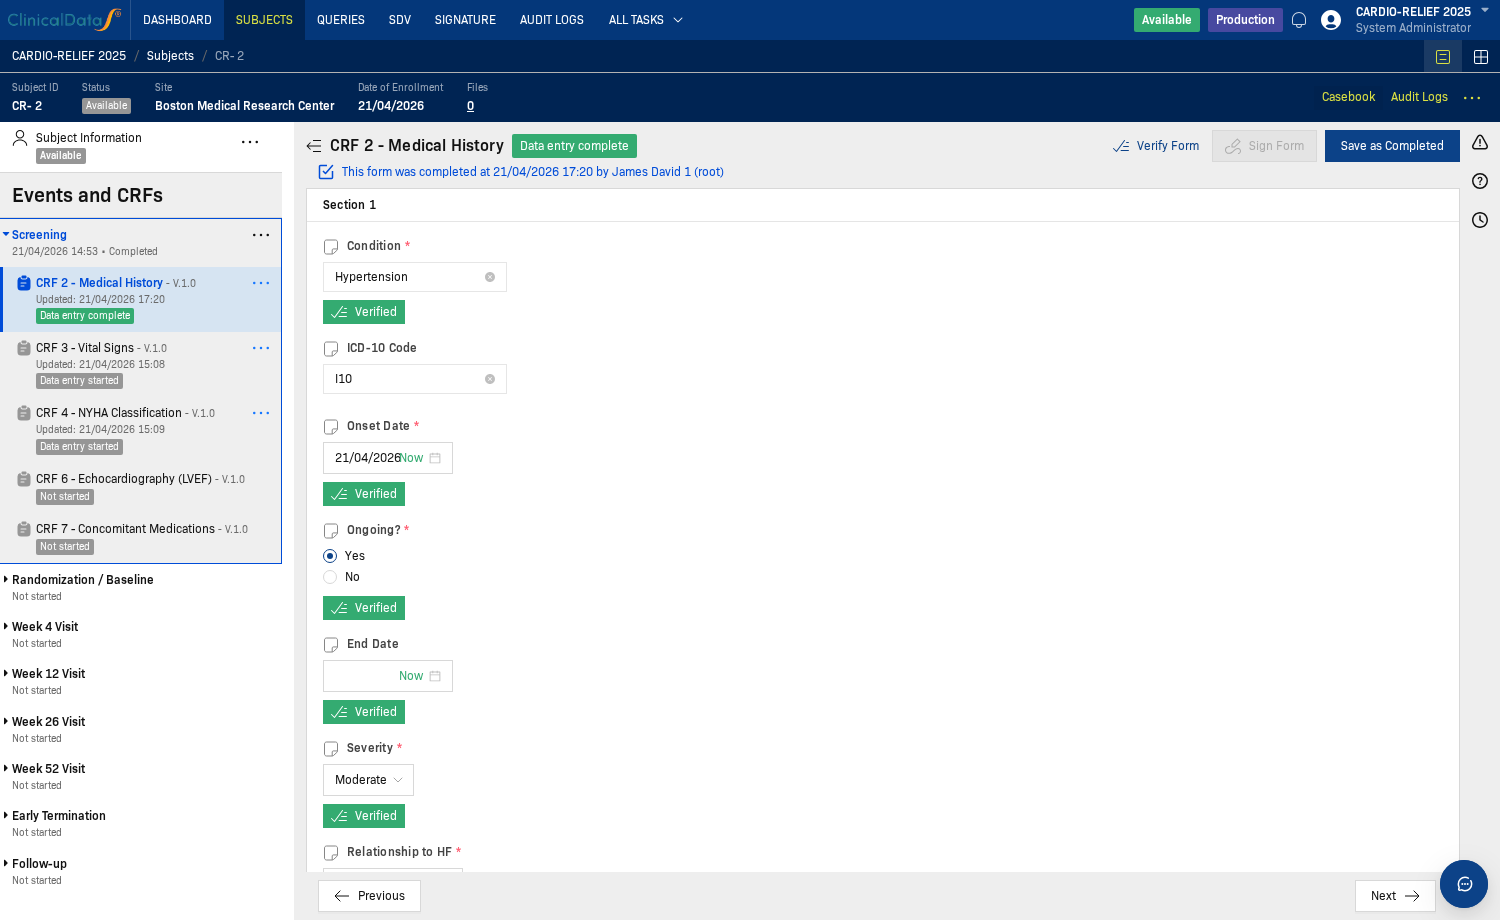
Step 4: Click each Unverified button
The CRF shows an Unverified button next to each field configured for SDV. Compare the field value against the source document, then click Unverified to mark that field as verified.
The button changes to Verified (green) after you click it.
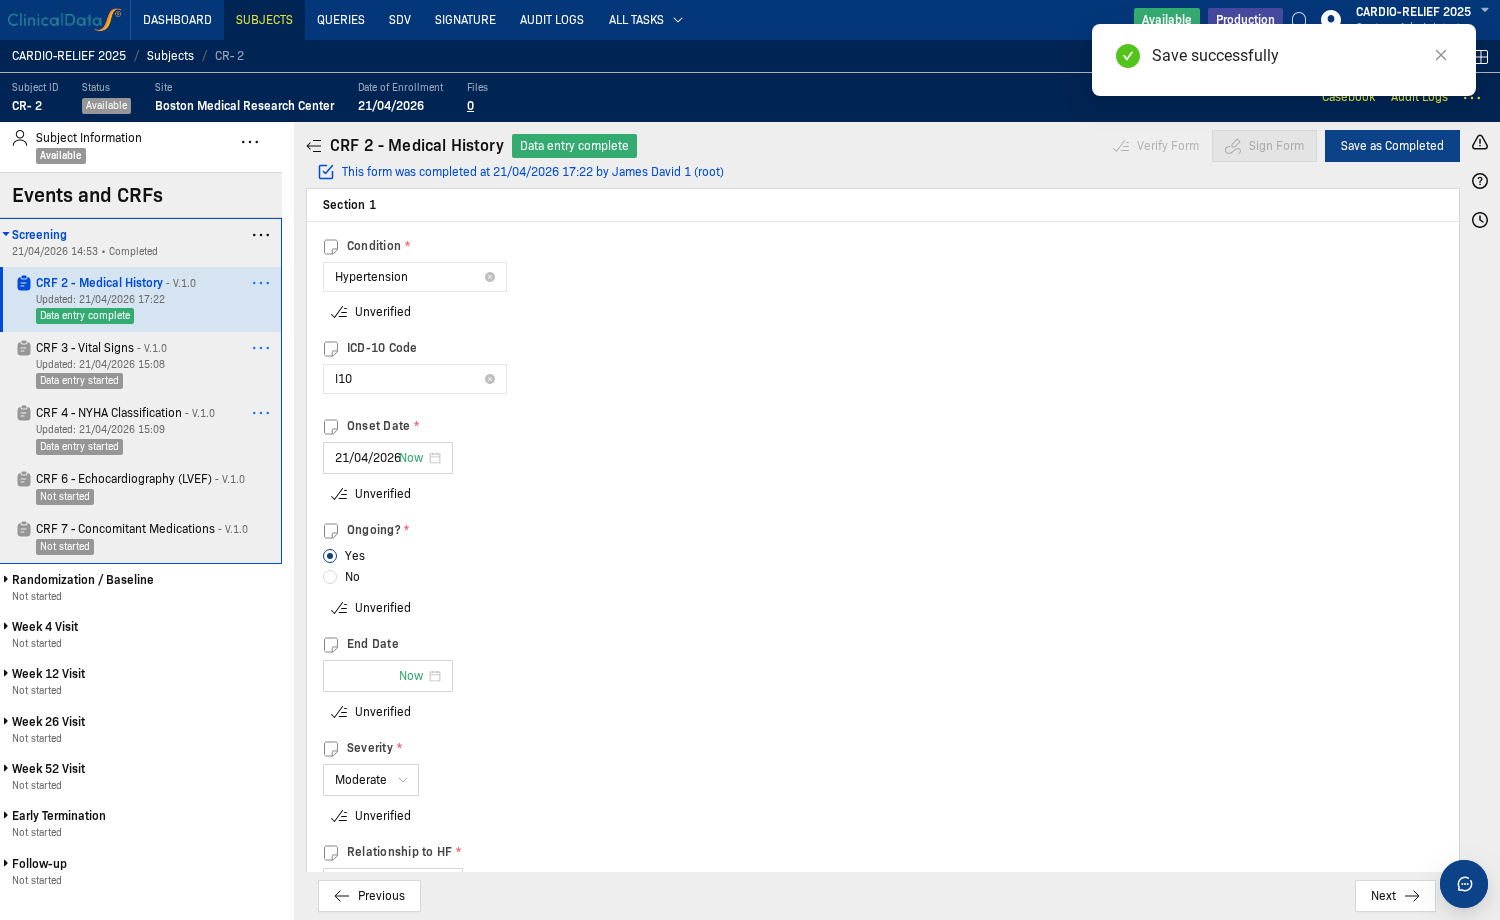
Repeat for each SDV-required field in the form.
Step 5: Click Verify Form
After all required fields are marked Verified, the Verify Form button at the top right of the form becomes active.
Click Verify Form to complete SDV for this CRF.
Step 6: Confirm the CRF is verified
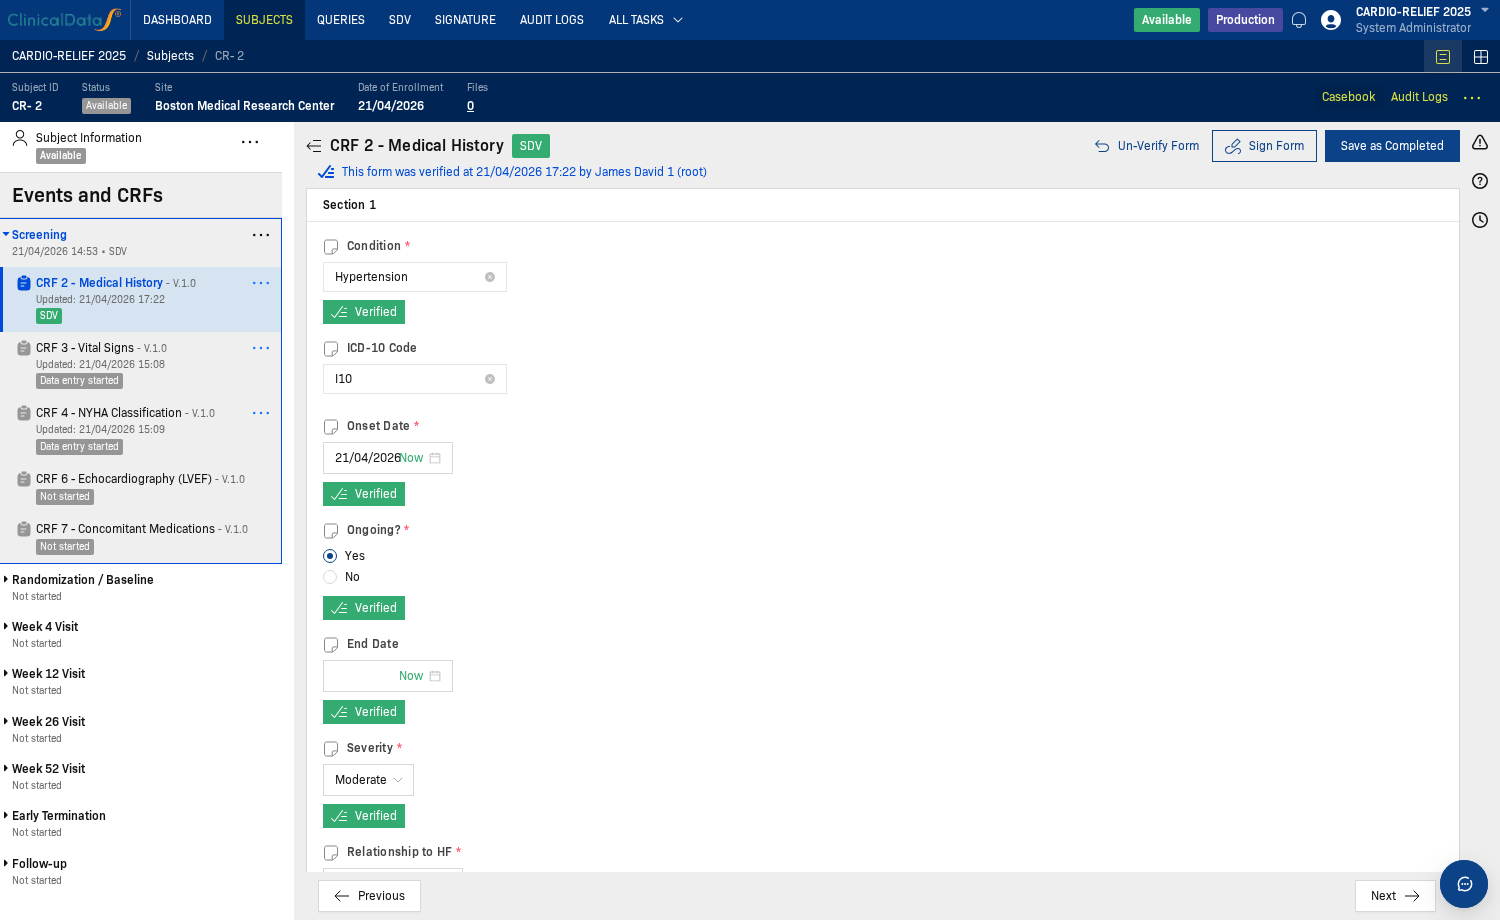
After clicking Verify Form:
- The form header shows an SDV badge (green).
- The action button changes to Un-Verify Form.
Return to View by CRF. The row now shows SDV status = Verified with Un-Verify and View in the Action column.
How to verify a subject
After completing CRF-level verification for all required CRFs, use View by Subject to perform subject-level verification.
Step 1: Open View by Subject
Click the View by Subject tab at the top of the SDV workspace.
The View by Subject table displays the following columns:
- Subject ID — the subject identifier
- SDV status — subject-level verification status (Not Verified, Verified, Partially Verified)
- Site Name — site where the subject is enrolled
- Subject Status — enrollment status (Available, Screened, etc.)
- # of Completed CRFs — total number of completed CRFs
- # of Verified CRF SDVs — number of CRFs that have been SDV-verified
- Total Available CRFs — total number of CRFs assigned to the subject across all events
- Action — contains the Verify button when eligible
To perform subject verification, you must verify all SDV-required CRFs of at least one complete event.
Step-by-step process:
- Complete an event: Enter data for all CRFs in at least one event (e.g., Screening, Baseline)
- Verify each CRF: Go to View by CRF → click each CRF → verify items → click Verify Form
- Subject becomes eligible: Once all required CRFs in that event are verified, the subject appears in this table
Configuration impact:
- "Allow SDV a subject when CRF is not Verified" = No: ALL required CRFs across ALL events must be verified
- "Allow SDV a subject when CRF is not Verified" = Yes: At least one complete event with all its required CRFs verified
Check your study's setting in SDV configuration.
Step 2: Review subject verification status
Locate the subject row in the table. Review the following columns to assess readiness:
- SDV status: Shows current verification state ("Not done" indicates not yet verified)
- # of Verified CRF SDVs: Number of CRFs that have been SDV-verified
- Total Available CRFs: Total CRFs assigned to this subject
The Verify button in the Action column appears when the subject meets all SDV configuration requirements for subject-level verification.
Step 3: Click Verify and confirm
Click the Verify button in the Action column for the subject you want to verify.
A confirmation dialog appears asking: "Are you sure you want to Verify Source Data Verification of the following Subject ID(s)?"
- The dialog lists the subject ID(s) to be verified
- Click Verify to confirm, or Cancel to abort
The Verify button appears only when all CRF-level SDV requirements for the subject are satisfied. The study setting Allow SDV a subject when CRF is not Verified (in SDV configuration) determines exactly which CRFs must be verified first.
Step 4: Confirm the result
After subject verification, the subject's SDV status updates to reflect completion.
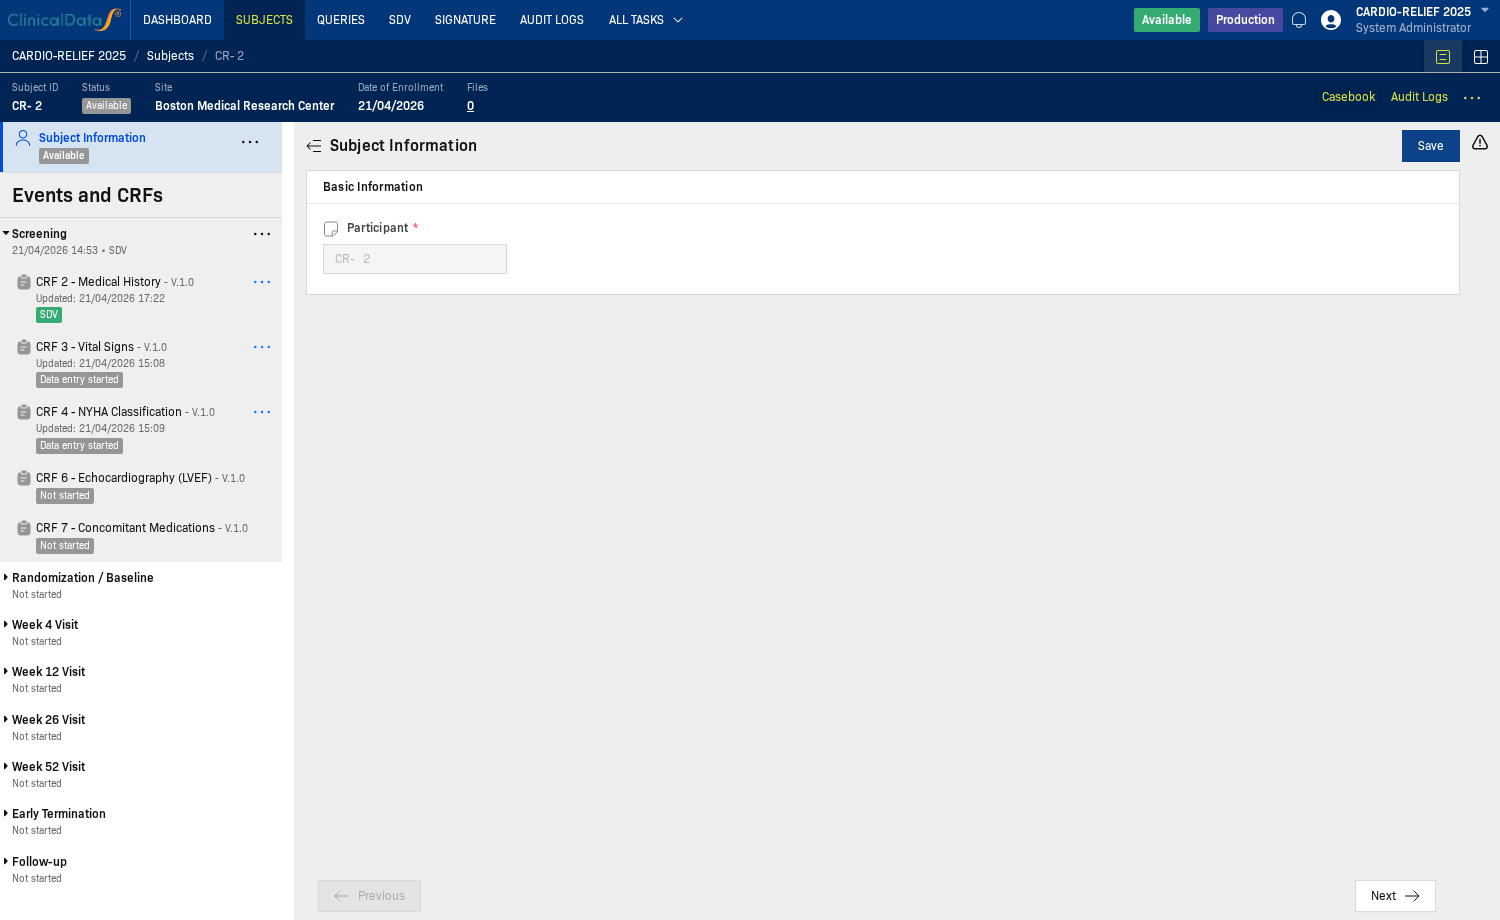
You can also confirm by opening the subject from the Subjects menu — CRFs that have been SDV-verified display an SDV badge in the casebook.
If the Unverified buttons are disabled
If the Unverified buttons on the form are greyed out and cannot be clicked:
- The CRF was not opened from the SDV queue. Close the form and click the CRF Name / Version link from View by CRF instead.
- Open query restrictions — check the Allow SDV when Queries is open setting in SDV configuration.
- Permissions — your role may not include SDV verification rights. Ask your study administrator.
Common issues
View by CRF is empty
- No subject CRF data has been saved yet.
- SDV is not configured for these CRFs — review SDV configuration.
- All CRFs in scope are already verified.
Verify Form is not visible or inactive
- Not all SDV-required items on the form have been marked Verified yet.
- The CRF was not opened from the SDV queue row (see Step 3 above).
View by Subject shows No data
- Subject aggregate rows appear only when all subject-level conditions are met.
- Complete all required CRF-level SDV work in View by CRF first.
Item-Level SDV (Partial Required CRFs)
When a CRF is configured with SDV Requirement = Partial Required, only specific items need verification. This enables a more targeted, risk-based approach to source data verification.
How It Works
- Study Admin configures which items require SDV in the CRF setup
- Only marked items show Unverified/Verified buttons
- CRF is automatically promoted to Verified when all required items are verified
- Cannot SDV the entire CRF at once — must verify each item individually
Item-Level SDV Workflow
- Open CRF from View by CRF (same as CRF-level SDV)
- Find items with Unverified buttons (only SDV-required items have them)
- Click each Unverified button after comparing with source
- When all required items are verified → CRF auto-promoted to Verified
- The form header shows SDV badge (green)
Auto-Promotion
The system automatically promotes verification status upward:
- All required items verified → CRF marked SDV'ed
- All CRFs in event verified → Event marked SDV'ed
- All events verified → Subject marked SDV'ed
Configuration
To enable item-level SDV:
- Go to App Setting → SDV in study setup
- Enable Item-Level SDV feature
- For each CRF, set SDV Requirement = Partial Required
- Select specific items for SDV in the CRF item configuration
See SDV Setup for detailed configuration steps.
Bulk SDV Operations
For efficiency, you can SDV multiple CRFs or subjects at once.
Bulk Verify CRFs
- In View by CRF, select checkboxes for multiple rows
- Click Verify Selected
- Confirm in the dialog
Bulk Un-Verify
Same flow as verify — select rows and click Unverify Selected.
Bulk Subject Verification
- In View by Subject, select checkboxes
- Click Verify Selected to SDV multiple subjects at once
SDV Audit Trail
Every SDV action is recorded with full audit trail:
- Who performed the verification
- When (timestamp)
- What was verified (CRF, subject, or specific items)
- Before/After status changes
View SDV History
SDV history is visible in:
- SDV Events page — status columns show current state
- Subject Casebook — SDV badge indicates verification status
- Audit Trail — accessible from subject detail page
Mobile SDV
SDV can be performed on the CDS Staff Mobile App (iOS/Android) when the study has useMobileSDV enabled.
- Same verification workflow as web
- Requires network connectivity (not available offline)
- All SDV actions are synced in real-time with the server
Related topics
- SDV configuration — SDV scope, percentage, criteria, and options