Dispenses (Randomization mode)
A dispense records the event when a site user gives an IP code (investigational product) to a study participant. In Randomization studies, dispensing a kit is a two-step process, split across two screens:
- Generate — assign the subject's next available kit. Done from inside the subject's event, not from this page.
- Dispense — confirm the kit was physically handed to the subject. Done from this page (IMP → Transfer → Dispenses).
The rest of this guide covers both steps, plus what to do if an assigned kit cannot be used.
Step 1 — Generate a kit from the subject's event
Dispensing starts on the subject's IMP entry, in the event's form menu — not on this page. Open the subject's event, fill in Date, Created By, and Notes as needed, save the entry, then click Generate.
Generate is disabled until the subject has been randomized, and is available to the same roles that confirm dispenses (by default the Clinical Research Coordinator, Investigator, Study Administrator, System Administrator, and Site Pharmacist roles). When clicked, it assigns the next available serial-numbered kit for the subject's treatment arm, populates the event's read-only IP field, and creates a dispense request with status Ready for dispense — which then appears on this page. A notification is sent to the Study Administrator and the Site Pharmacist that a new dispense request is ready to be processed.
See Data Entry — IMP Dispensing (Randomization mode) for the full layout of that entry.
If no serial-numbered kit is available for the subject's site and treatment-arm combination, Generate fails and dispensing is blocked until stock is resupplied. See Dispense blocked by treatment-arm stock below.
Dispenses list
Once a kit has been generated, the request appears here with status Ready for dispense.
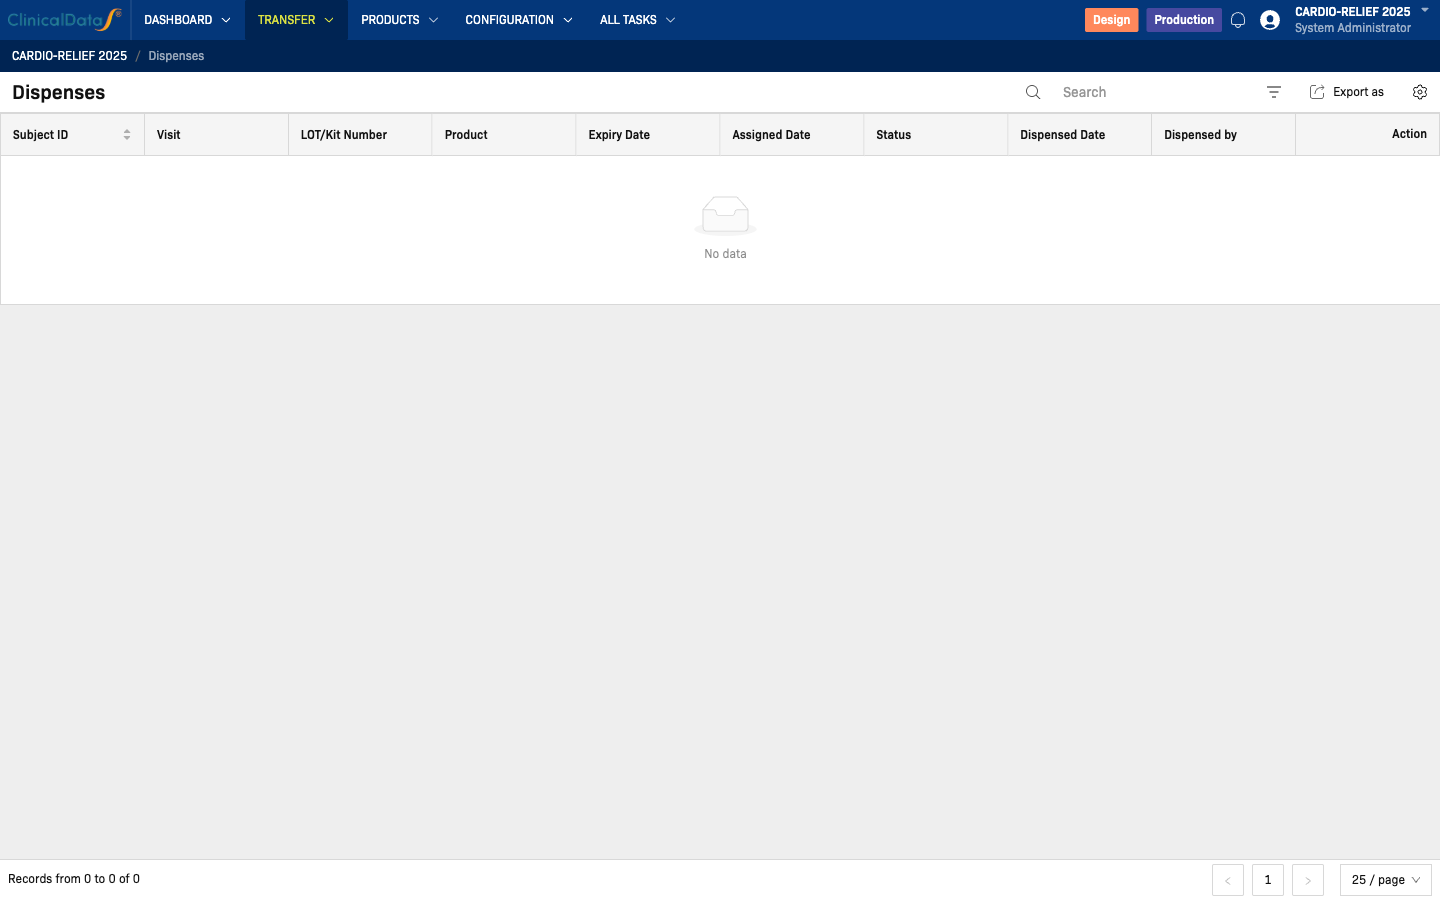
| Column | Description |
|---|---|
| Subject ID | The randomized subject who received (or is scheduled to receive) the IP |
| Visit | The visit/event the dispense is linked to |
| IP Code Number | The assigned kit's serial number — opens the IP code detail page |
| Product | Product name (always the study's single configured product in this mode) |
| Expiry Date | Expiration date of the assigned kit |
| Assigned Date | Date the kit was assigned to the subject |
| Note | Free-text note on the dispense record |
| Status | Ready for Dispense, Dispensed, On hold, or Cancelled |
| Dispensed Date | Date the dispense was confirmed |
| Dispensed by | Site user who confirmed the dispense |
There is no treatment-arm/Study Group column on this list — dispensing stays blinded at site level.
Use Search to filter by Subject ID, Status, or Created Date.
Step 2 — Confirm the dispense
Once a request shows Ready for Dispense, click its Dispense row action (or open View and click Dispense from there) to confirm the kit was physically given to the subject.
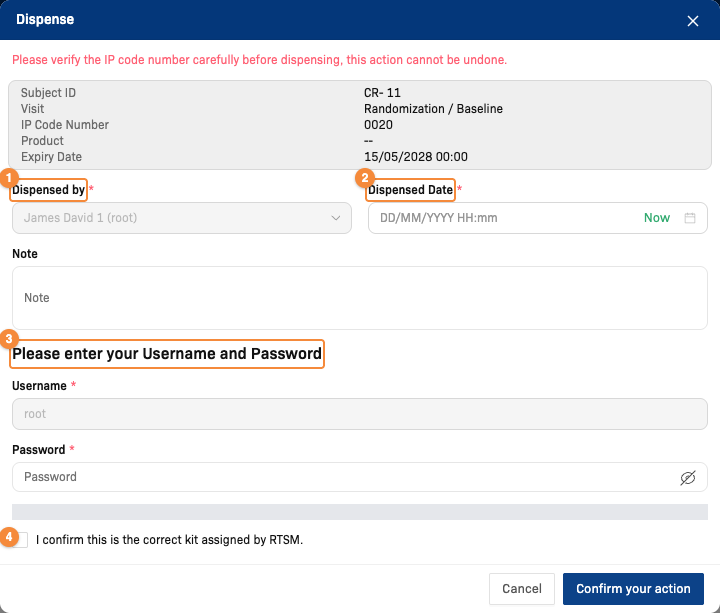
- Dispensed by: fixed to the current user
- Date and time the kit is handed to the subject
- Re-enter your credentials to sign the dispense
- Confirm that this is the kit assigned by RTSM
The dialog restates the subject, visit, and kit, then asks for:
| Field | Required | Description |
|---|---|---|
| Dispensed by | Yes | Fixed to the current user |
| Dispensed Date | Yes | Date/time the kit is handed to the subject; cannot be before the kit's assigned date or in the future |
| Note | No | Optional remarks |
| Username / Password | Yes | Re-enter your credentials to confirm the action |
| Confirmation checkbox | Yes | "I confirm this is the correct kit assigned by RTSM." |
The dialog also warns: "Please verify the IP code number carefully before dispensing, this action cannot be undone." Click Confirm your action to dispense. Once confirmed, the dispense and its serial number both move to status Dispensed.
Who can click Dispense: Available to:Clinical Research CoordinatorInvestigatorStudy AdministratorSystem AdministratorSite Pharmacist(default roles — your study may differ)
Report an issue with an assigned kit
If an assigned kit cannot be used (for example, it is found damaged before it reaches the subject), click Report Issue instead of confirming the dispense. This is only available for dispenses still in Ready for Dispense status.

What this should show: the Report Issue dialog — the Rejection Reason options (Damaged, Omitted, Lost) and the Additional Notes field.
Select a Rejection Reason (Damaged, Omitted, or Lost) and add optional notes, then submit. The dispense request is cancelled, the kit's serial number is marked accordingly, and the subject's event returns to a state where Generate can be used again to assign a new kit.
Report Issue is available to the same roles as Dispense.
View dispense detail
Click View on a row (or the row itself, depending on your list configuration) to open the Dispense Details panel: a Dispense Summary (Subject ID, Visit, kit number, Product, Expiry Date, Current Status, Requested Date, Created By, Note) and an Audit History of changes to the record. If the dispense is still Ready for Dispense, the Dispense and Report Issue actions are also available from this panel.
Who can view dispense details:
Available to 9 roles
Clinical Research CoordinatorInvestigatorSite MonitorStudy AdministratorStudy MonitorSystem AdministratorSponsor Data ManagerMedical MonitorSite Pharmacist(default roles — your study may differ)Who can do what
| Step | Action | Roles |
|---|---|---|
| 1. Assign a kit | Generate (on the subject's event) | Clinical Research Coordinator, Investigator, Study Administrator, System Administrator, Site Pharmacist |
| 2. Confirm the dispense | Dispense (on this list) | Clinical Research Coordinator, Investigator, Study Administrator, System Administrator, Site Pharmacist |
| — | Report Issue | Clinical Research Coordinator, Investigator, Study Administrator, System Administrator, Site Pharmacist |
| — | View | Clinical Research Coordinator, Investigator, Site Monitor, Study Administrator, Study Monitor, System Administrator, Sponsor Data Manager, Medical Monitor, Site Pharmacist |
By default, the Clinical Research Coordinator, Investigator, Study Administrator, System Administrator, and Site Pharmacist roles can perform both steps. Roles may differ in your study.
See the full Permission Matrix for how these roles apply across the platform.
Dispense blocked by treatment-arm stock
After a subject is randomized, Generate depends on IP stock being available for that subject's assigned treatment arm at the site. If no serial-numbered kit is available for the site and treatment-arm combination, Generate fails until stock is resupplied.
While blocked, the site team cannot assign a kit for the affected subject. Contact your Study Administrator or Supply Chain team to arrange a resupply shipment to the site for the missing treatment arm.
This is a cross-module behavior: the same treatment-arm assignment that drives this stock check is set during randomization. See Randomize a Subject for how subjects are assigned to a treatment arm and for this same stock-gating note from the randomization side.
An IP code must be at the site (delivered and receipt confirmed) before it can be generated for a subject. Randomization must also be configured if Purpose = Randomization.
Related Docs
- Data Entry — IMP Dispensing (Randomization mode) — where the Generate step lives, in context with the rest of the event's form menu.
- Studies using PSP mode instead: For PSP Study — Dispenses