Delivery to Site (Randomization mode)
A delivery request transfers investigational product (IP) kits from a Site Pharmacy (acting as the local warehouse) to a Clinical Research Site. In Randomization mode, Tracking method is fixed to By Unique Serial Number, and kit selection at Step 2 is filtered by treatment arm so the site only ever receives kits for the arm it is assigned to supply.
Navigate: IMP → Transfer → Delivery to Site
- Study status must be Available.
- IP kits must already be received into the source Site Pharmacy — see Receipts — before they can be delivered to a site.
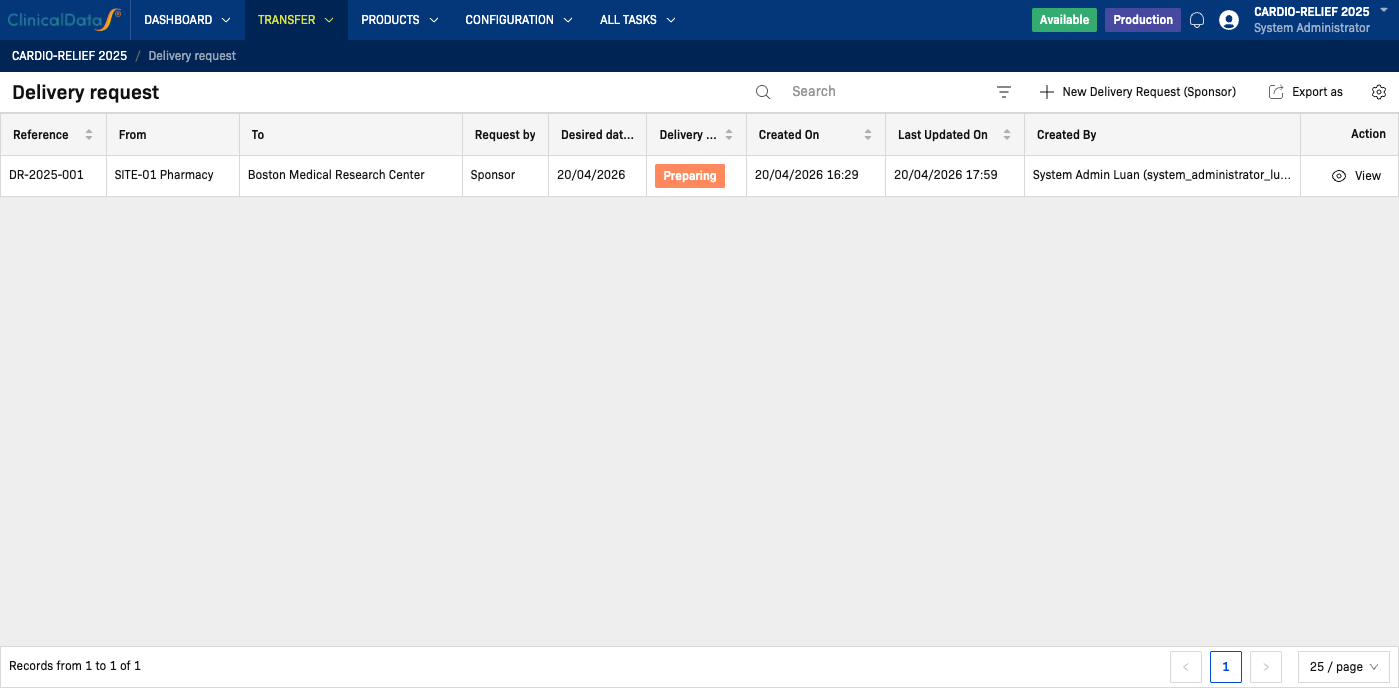
Delivery request list
The list shows every delivery request for the study:
| Column | Description |
|---|---|
| Reference | Delivery request reference number (sortable) |
| From | Source Site Pharmacy (warehouse) |
| To | Destination Clinical Research Site |
| Request by | Whether the request was created by the Sponsor or by the Site |
| Desired date of delivery | The requested delivery date |
| Delivery status | Current step in the delivery workflow (sortable) |
| Created On / Last Updated On | Sortable timestamps |
| Created By | User who created the request |
| Action | View |
Use Search to filter by reference or site name, or apply the Status, Created date, From, and To filters. Click the export icon in the toolbar to download the list.
Create a new delivery request
Click New Delivery Request (Sponsor) to open the wizard. Its steps are shown at the top: Delivery Information, Detailed Operation, Warehouse prepare, On delivery and Validated.
Step 1 — Delivery information
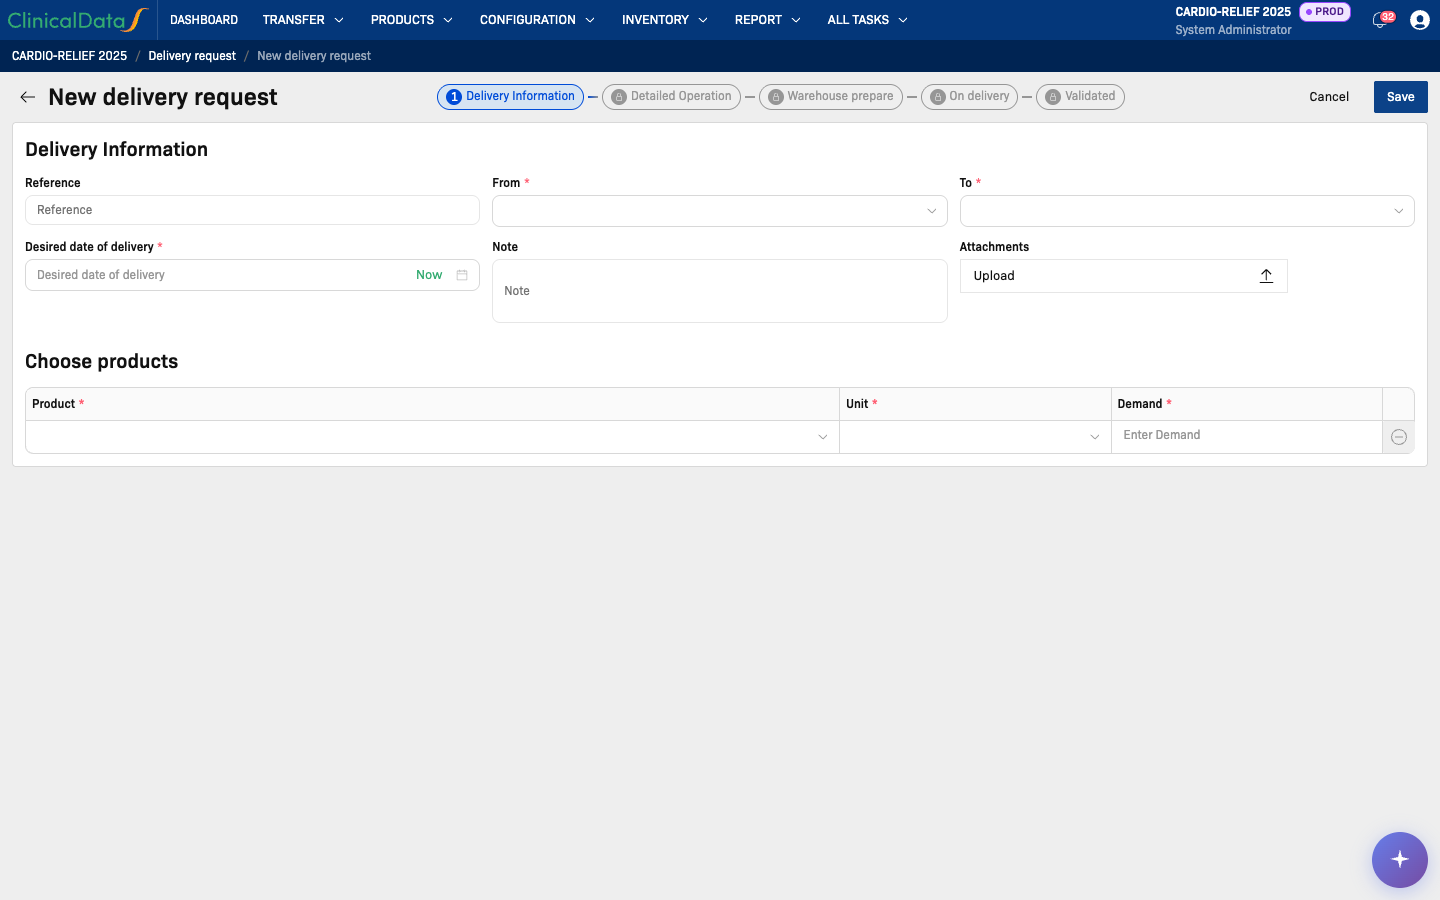
| Field | Description |
|---|---|
| Reference | Optional reference code for this delivery request |
| From | Source Site Pharmacy |
| To | Destination Clinical Research Site |
| Desired date of delivery | Expected delivery date. Click Now to use today's date |
| Note | Optional context about the delivery |
| Attachments | Optional supporting documents |
Choose products — enter the Product, Unit and Demand. Randomization studies are configured with a single investigational product, so this table shows one Product / Unit row and there is no More product action to add further rows.
Click Save to save the request in Draft status and proceed to Step 2.
Step 2 — Detailed Operation
This is where Randomization mode differs from PSP mode.
Both Randomization mode and PSP mode with Tracking = By Unique Serial Number present a dual-list "Available / Selected Kits" picker, but they behave differently:
- Randomization mode (this page): the picker is split into one block per treatment arm defined in the study's randomization configuration. Each block only shows kits for that arm, and each has its own required-count target proportional to the arm's randomization ratio.
- PSP Serial mode: the picker shows one block per product with no treatment-arm filter — any available serial number for the product can be selected.
If this study uses Randomization, the delivery is scoped to specific treatment arms. Do not assume a serial number can be freely picked without regard to arm, the way it can in PSP Serial mode.

What this should show: the Detailed Operation screen for a Randomization-mode delivery request in Draft status, with the product's kit picker expanded to show one Available/Selected Kits block per treatment arm, each with its own [selected / required] counter.
Understanding the layout
For the study's product, one panel pair is shown per treatment arm:
| Panel | Description |
|---|---|
| Available | IP codes at the source Site Pharmacy that are eligible for this arm |
| Selected Kits | Kits chosen for this delivery, for this arm |
Each arm block shows a counter such as [0 / 3]. The required count is derived from the arm's randomization ratio applied to the demand entered in Step 1.
Columns shown in each panel: IP Code and Expired date (if the study tracks expiration dates).
Selecting IP codes
- In the Available panel for a treatment arm, check the checkbox next to each IP code to include.
- Click Move to select to move the checked kits to that arm's Selected Kits panel. The counter updates.
- Repeat until every arm block shows the required count.
To remove a kit from Selected Kits, check it there and click Remove — it returns to Available.
Confirming the selection
Once every treatment-arm block shows the required count, click Delivery confirmation. An e-signature dialog opens — enter your Username (pre-filled) and Password, then click Confirm delivery. The request status changes from Draft to Prepared.
Click Reject to stop the request at this stage (with an optional reason). The request moves to Cancelled.
Step 3 — Warehouse Prepare
The Warehouse Manager reviews the confirmed kit selection and physically prepares the kits for shipment.
| Action | Description |
|---|---|
| Delivery confirmation | Confirms the kits have been prepared and are ready to ship |
| Reject | Rejects the delivery request (with reason) |
Once confirmed, the request advances to Step 4 — On Delivery.
Step 4 — On Delivery
The kits are in transit to the Clinical Research Site. When the site receives the shipment, a site user opens Delivery Confirmation at Site.
| Field | Required | Description |
|---|---|---|
| Completion date of delivery | Yes | The date the delivery was physically received |
| Attachments | No | Supporting documents (e.g., delivery note) |
| Comment of delivery | No | Free-text remark |
| Shipping Error | No | Yes/No — whether anything was omitted or damaged in transit |
If Shipping Error = Yes, the dialog adds a discrepancy checklist for the product: an Omitted list and a Damaged list of the individual IP codes/serial numbers that were not received intact. Check the affected serial numbers in each list, then enter your Username and Password and click Validate to confirm.
What this should show: the Delivery Confirmation at Site dialog with Shipping Error set to Yes, showing the per-serial-number Omitted and Damaged checklists.
Step 5 — Validated
The request is marked Done. The page shows a read-only summary of the request across every stage — Sponsor selection, warehouse preparation, and the site's confirmation — including any omitted or damaged kits reported in Step 4.
Delivery request statuses
| Status | Description |
|---|---|
| Draft | Request created; Sponsor is selecting kits (Steps 1–2) |
| Prepared | Kit selection confirmed by Sponsor; Warehouse Manager is preparing shipment (Step 3) |
| On delivery | Kits are in transit (Step 4) |
| Done | Delivery confirmed at the destination site (Step 5) |
| Rejected | Request was rejected at a review step |
| Cancelled | Request was stopped, including by Reject at Step 2 — Detailed Operation |
Who can act at each step
| Step | Action | Roles |
|---|---|---|
| 1 — Delivery information | Create the delivery request | Study Administrator, Study Sponsor, System Administrator, Unblinded Supply Manager, Sponsor Supply Manager |
| 2 — Detailed Operation | Confirm delivery or Reject | Study Administrator, Study Sponsor, System Administrator, Unblinded Supply Manager, Sponsor Supply Manager, Sponsor Manager |
| 3 — Warehouse Prepare | Confirm preparation or Reject | Study Administrator, Study Sponsor, System Administrator, Sponsor Supply Manager, Warehouse Manager |
| 4 — On Delivery | Confirm receipt at the site | Clinical Research Coordinator, Investigator, Study Administrator, Study Sponsor, System Administrator, Sponsor Supply Manager, Site Pharmacist |
For the full permission reference, see the Permission Matrix.
Related Docs
Studies using PSP mode instead: For PSP Study — Delivery to Site